Is your shower head spraying every which way except on you? The Water Research Foundation suggests mineral buildup is a common cause. One solution involves knowing how to take apart shower head and clean its components. Using simple tools like an adjustable wrench, and following some easy steps, even someone unfamiliar with basic plumbing can restore optimal water flow. In this guide, we provide a comprehensive approach to safely disassembling and cleaning your shower head, getting you back to enjoying a refreshing shower in no time.
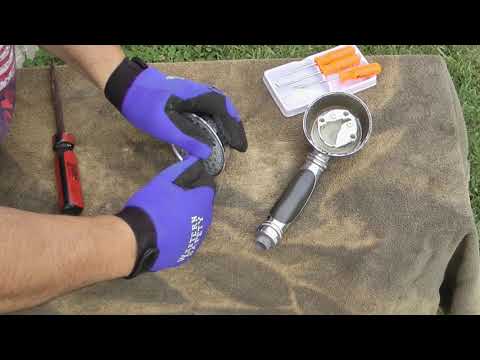
Image taken from the YouTube channel WJ Handy Dad , from the video titled How to disassemble shower head (all methods) .
Is your shower experience less than invigorating?
Does the water trickle instead of flow?
Before you call a plumber, consider this: the solution might be simpler than you think.
Your shower head, that humble fixture we often take for granted, can become a breeding ground for mineral deposits, grime, and bacteria.
These build-ups not only reduce water pressure but can also affect the quality of your shower.
Fortunately, disassembling and cleaning your shower head is a straightforward task that can restore it to its former glory.
Why take apart your shower head?
There are several compelling reasons.
Why Disassemble Your Shower Head?
- Cleaning: Over time, minerals like calcium and lime accumulate inside the shower head, especially in areas with hard water. This buildup restricts water flow and can even affect water quality.
- Unclogging: Even if you don’t have hard water issues, small particles and debris can clog the spray nozzles, leading to uneven water distribution.
- Replacing Parts: Sometimes, a component of your shower head, like an O-ring or a filter screen, might wear out or break. Disassembly allows you to identify and replace these parts.
- Upgrade: A shower head upgrade is a great way to elevate your daily shower.
Addressing these issues can dramatically improve your shower experience and even save water.
It’s Easier Than You Think!
The prospect of taking apart plumbing fixtures might seem daunting, but fear not!
Disassembling and cleaning a shower head is a task that most homeowners can handle with basic tools and a bit of patience.
- This guide will walk you through each step, ensuring a smooth and successful process.
- We’ll provide clear instructions and helpful tips to overcome any potential challenges.
- With a little effort, you can restore your shower head to its optimal condition.
You can do this!
Imagine the satisfaction of stepping into a revitalized shower, all thanks to your own handiwork.
Overview of the Steps
Here’s a quick look at what we’ll cover in this guide:
- Gathering Your Supplies: We’ll identify the essential tools and cleaning agents needed for the task.
- Removing the Shower Head: Learn how to safely detach the shower head from the shower arm.
- Disassembly and Deep Cleaning: We’ll break down the shower head and target those stubborn mineral deposits.
- Reassembly: Putting everything back together correctly to prevent leaks.
- Troubleshooting: Addressing common issues and preventative measures.
By following these steps, you’ll be well on your way to enjoying a revitalized and refreshing shower experience.
Let’s get started!
Why take apart your shower head?
There are several compelling reasons.
Addressing these issues can dramatically improve your shower experience and even save water.
It’s Easier Than You Think!
The prospect of taking apart plumbing fixtures might seem daunting, but fear not!
Disassembling and cleaning a shower head is a task that most homeowners can handle with basic tools and a bit of elbow grease.
But before we dive into the process, let’s make sure you’re properly equipped.
Having the right tools and supplies on hand will not only make the job easier but also help prevent damage to your shower head or plumbing.
Gather Your Arsenal: Tools and Supplies for the Task
Successfully disassembling and cleaning your shower head hinges on having the right tools and supplies readily available.
This preparation prevents frustrating interruptions and ensures you can complete the task efficiently and effectively.
Here’s a breakdown of what you’ll need:
The Essential Wrench
A wrench is arguably the most critical tool for removing and reattaching your shower head.
The adjustable wrench is your best bet here.
Its adjustable jaws allow it to fit a variety of nut sizes, making it a versatile tool for many plumbing tasks.
When choosing an adjustable wrench, opt for one with a smooth jaw to minimize the risk of scratching the shower head’s finish.
Pliers: A Helping Hand
While a wrench is the primary tool, pliers can be useful in certain situations.
For instance, if you need to grip a small part or gently persuade a stubborn component to move, pliers can provide the extra leverage you need.
Slip-joint pliers are a good all-around choice for general tasks.
Plumber’s Tape: Sealing the Deal
Plumber’s tape (also known as Teflon tape) is essential for creating a watertight seal when you reattach the shower head.
This inexpensive tape wraps around the threads of the shower arm, preventing leaks and ensuring a consistent water flow.
Always have a roll of plumber’s tape on hand before you begin.
Vinegar: Nature’s Cleaning Powerhouse
White vinegar is a fantastic natural cleaning agent for removing mineral deposits, grime, and mildew.
Its mild acidity effectively dissolves buildup without damaging the finish of your shower head.
Simply soak the shower head components in vinegar for a few hours to loosen stubborn deposits.
Complementary Cleaning Supplies
While vinegar is a great starting point, consider having other cleaning supplies available for a more thorough cleaning.
A small brush (like an old toothbrush) can help scrub away grime from hard-to-reach areas.
Mild soap or a specialized bathroom cleaner can also be used for general cleaning.
The Gentle Touch of a Soft Cloth
A soft cloth is indispensable for gently cleaning and drying the shower head and its components.
Avoid using abrasive materials that could scratch or damage the finish.
Microfiber cloths are an excellent choice for their softness and absorbency.
Protecting Your Hands: Rubber Gloves
Cleaning can be a messy business, especially when dealing with grime and harsh cleaning agents.
Protect your hands by wearing rubber gloves throughout the disassembly and cleaning process.
This will prevent skin irritation and keep your hands clean.
With these tools and supplies assembled, you’ll be well-prepared to tackle the task of disassembling and cleaning your shower head, restoring it to its optimal performance.
Having the right tools set aside, the next hurdle is understanding how to safely detach the shower head from its moorings. This step, while seemingly straightforward, requires finesse to avoid damaging your fixtures or plumbing.
Shower Head Removal: A Step-by-Step Guide
Removing a shower head might seem intimidating, but by taking it one step at a time, it’s an easy task. Follow these instructions to safely remove the shower head from the shower arm. Always exercise caution to avoid any unnecessary damage.
Identifying the Connection Point
The first step is to pinpoint where the shower head connects to the shower arm. This is usually a threaded connection secured by a nut. Take a close look to understand how the two components join.
Loosening the Nut with Care
Carefully position your wrench around the nut connecting the shower head to the shower arm.
Grip firmly but gently, ensuring the wrench is snug to prevent slippage.
Slowly apply pressure to loosen the nut. Turn the wrench in a counter-clockwise direction.
Protecting the Finish
Shower heads often have a decorative finish that can be easily scratched or marred. To prevent damage during removal, consider these tips:
- Wrap the nut with tape: Before applying the wrench, wrap the nut with a layer or two of plumber’s tape or masking tape. This provides a protective barrier against the metal of the wrench.
- Use a cloth: Alternatively, place a small piece of cloth between the wrench and the nut.
These simple precautions can save you from unsightly scratches.
When It’s Stuck: Dealing with Stubborn Connections
Sometimes, mineral buildup or corrosion can cause the shower head to seize onto the shower arm. If the nut refuses to budge, don’t force it! Instead, try this:
- Apply penetrating oil: Spray a penetrating oil (like WD-40) onto the connection point. Let it sit for 15-30 minutes to work its way into the threads and loosen the corrosion.
- Gentle heat: Applying gentle heat with a hairdryer can also help to expand the metal and break the bond. Be cautious not to overheat the area.
After applying penetrating oil and/or heat, try loosening the nut again. Apply steady pressure and avoid jerky movements.
The Final Step: Unscrewing by Hand
Once you’ve successfully loosened the nut with the wrench, you should be able to unscrew the shower head the rest of the way by hand. Continue turning it in a counter-clockwise direction until it detaches completely from the shower arm.
These simple precautions can save you from accidentally damaging the fixture during the removal process. Once the shower head is detached, the real work begins: giving it a thorough cleaning to restore optimal performance.
Disassembly and Deep Cleaning: Unclogging and Revitalizing Your Shower Head
Now comes the satisfying part: diving into the inner workings of your shower head to banish grime and mineral buildup. The specific steps can vary slightly depending on the type of shower head you have, but the general principles remain the same.
Identifying Your Shower Head Type
First, take a moment to identify the type of shower head you’re working with.
- Fixed shower heads, directly attached to the shower arm, are the most common.
- Handheld shower heads, connected via a hose, offer more flexibility.
- Rainfall shower heads, designed for a gentle, cascading flow, may have unique disassembly requirements.
Understanding your shower head’s design will help you approach disassembly with the right strategy.
Locating and Addressing the Spray Nozzles
The spray nozzles are the small holes through which water flows. These are prime targets for mineral deposits, especially in areas with hard water.
Often, these nozzles are designed to be removable, making cleaning much easier. Look closely; some may simply pop out, while others might require a small tool or a gentle twist to detach.
The Vinegar Soak: A Natural Solution for Mineral Buildup
Once you’ve removed the spray nozzles (if possible), prepare a bath of white vinegar. Vinegar’s acidity gently dissolves mineral deposits without harsh chemicals.
Submerge the nozzles in vinegar for at least a few hours, or ideally overnight, to allow the vinegar to fully penetrate and break down the mineral deposits from hard water.
For particularly stubborn buildup, you can gently scrub the nozzles with an old toothbrush after soaking.
Cleaning the Shower Head Body
While the nozzles are soaking, turn your attention to the shower head body.
Using your chosen cleaning supplies (mild soap and water usually suffice) and a soft cloth, carefully wipe down all surfaces. Pay attention to any crevices or areas where grime tends to accumulate.
Avoid abrasive cleaners, as these can damage the finish.
Checking and Replacing O-Rings
O-rings are small rubber seals that create a watertight connection between parts. Examine the O-rings on your shower head for any signs of damage, such as cracks or brittleness.
Damaged O-rings can cause leaks, so replacing them is essential. You can usually find replacement O-rings at your local hardware store. Bring the old O-ring with you to ensure you get the correct size.
Disassembly and Deep Cleaning: Unclogging and Revitalizing Your Shower Head
Now comes the satisfying part: diving into the inner workings of your shower head to banish grime and mineral buildup. The specific steps can vary slightly depending on the type of shower head you have, but the general principles remain the same.
Reassembly: Putting It All Back Together
With your shower head components sparkling clean, the next step is reassembly. This phase is just as crucial as disassembly, as it ensures a leak-free and optimally performing shower experience. Paying attention to detail now will save you from drips and wasted water later on.
Thoroughly Rinse All Parts
Before you begin putting everything back together, it’s essential to rinse all the individual components thoroughly. This step is non-negotiable.
You want to make absolutely certain that all traces of vinegar and any cleaning solutions are completely removed. Residue can potentially affect water quality or even degrade the materials over time, so don’t skip this step.
Reattaching the Spray Nozzles
Carefully reattach each spray nozzle to the shower head body. Make sure they are properly seated and secure.
Many nozzles simply snap back into place, while others may require a gentle twist. If you encounter any resistance, double-check the alignment and avoid forcing them.
The Plumber’s Tape Secret: Preventing Leaks
Here’s where plumber’s tape becomes your best friend. This inexpensive tape is the key to creating a watertight seal between the shower head and the shower arm.
-
Proper Application is Key: To apply the plumber’s tape correctly, wrap it around the threads of the shower arm in a clockwise direction (when looking at the threads head-on). Overlap each layer slightly, using enough tape to create a noticeable thickness, but not so much that you can’t screw the shower head on. Three to four wraps are usually sufficient.
-
Why Clockwise? Wrapping in the correct direction ensures that the tape tightens as you screw on the shower head, rather than unraveling.
Securing the Connection: Shower Head to Shower Arm
Carefully screw the shower head back onto the shower arm. Turn it by hand until it’s snug.
Then, use your wrench to tighten it further. Remember: gentle but firm is the name of the game here.
Avoiding Overtightening: A Common Mistake
It’s tempting to crank down on the wrench to ensure a super-tight seal, but overtightening is a common mistake that can lead to problems.
Overtightening can damage the threads on either the shower arm or the shower head itself, potentially causing leaks or even cracking the fixture. Moreover, excess pressure on the seal will damage the tape.
- The Right Approach: Tighten the connection until it feels secure and the shower head no longer wobbles. If you turn on the water and notice a small leak, slightly tighten the connection further. Incremental adjustments are key.
Troubleshooting Common Issues: Addressing Stubborn Problems
Even with careful preparation and execution, you might encounter a few hiccups along the way. Don’t worry, these challenges are often easily surmountable with a little patience and know-how. Let’s tackle some of the more common issues you might face when disassembling and cleaning your shower head.
The Unyielding Grip of Corrosion
Sometimes, despite your best efforts, a shower head refuses to budge. The culprit? Severe corrosion, often locking the shower head onto the shower arm with an unshakeable grip. But don’t reach for the brute force just yet!
Heat as a Helping Hand
Heat can be your ally in this situation. Applying heat to the connection point can help expand the metal, potentially loosening the corrosion’s hold.
You can use a hairdryer or, for more stubborn cases, a heat gun on a low setting. Exercise extreme caution when using a heat gun to avoid burns or damaging surrounding materials.
Apply heat in short bursts, checking periodically to see if the connection has loosened.
The Power of Penetrating Oil and Patience
If heat alone isn’t enough, combine it with a penetrating oil. Apply the oil generously to the joint where the shower head connects to the shower arm.
Give the oil ample time to work its magic – ideally, several hours or even overnight. Reapply the oil periodically to keep the area saturated. The penetrating oil will seep into the corroded areas, helping to break down the bonds.
After sufficient soaking, try loosening the shower head again, using your wrench with caution. Remember, slow and steady wins the race.
When to Call in the Professionals
If you’ve exhausted all other options and the shower head remains stubbornly fixed, it might be time to call a plumber. Forcing the connection could damage the pipes inside the wall, leading to a much bigger and costlier problem.
Sometimes, knowing when to seek professional help is the smartest move.
Preventing Future Mineral Deposits: A Proactive Approach
Once you’ve successfully cleaned your shower head, you’ll want to minimize future buildup of those pesky mineral deposits. Here are some preventative measures you can take:
The Water Softener Solution
If you live in an area with particularly hard water, consider investing in a water softener. These systems remove minerals like calcium and magnesium from your water supply, reducing scale buildup throughout your plumbing system, not just in your shower head.
While a water softener represents a larger investment, the long-term benefits for your plumbing and appliances are significant.
Regular Cleaning: Your First Line of Defense
Even with softened water, regular cleaning is still essential. Make it a habit to clean your shower head every few months to prevent mineral deposits from accumulating.
A quick soak in vinegar can work wonders. Schedule it into your cleaning routine, and you’ll keep your shower head performing optimally.
Consider a Filtered Shower Head
Another option is to install a filtered shower head. These shower heads contain filters that remove chlorine, sediment, and other impurities from the water, which can also help reduce mineral buildup.
This is an easier and more affordable option than installing a whole-house water softener.
Dealing with Stripped Threads: Repair or Replace?
Stripped threads on either the shower arm or the shower head itself present a different kind of challenge. If the threads are damaged, it can be difficult, if not impossible, to achieve a watertight seal.
Assessing the Damage
First, carefully examine the threads on both the shower arm and the shower head. If the damage is minor, you might be able to salvage the situation.
The Teflon Tape Trick: A Temporary Fix
For slightly damaged threads, try using extra plumber’s tape (Teflon tape). Wrap several layers of tape around the threads of the shower arm, applying it in the direction of the thread.
This can provide enough additional grip to create a temporary seal. However, be aware that this is often a short-term solution.
Thread Repair Compounds: A More Robust Approach
For more significant thread damage, consider using a thread repair compound. These compounds are designed to fill in damaged threads and create a new, functional surface.
Follow the manufacturer’s instructions carefully when applying these compounds.
When Replacement is the Only Option
If the threads are severely stripped or corroded beyond repair, replacement is often the only viable option. Replacing either the shower head or the shower arm is a relatively inexpensive and straightforward project.
It’s often the most reliable way to ensure a leak-free and properly functioning shower. Don’t hesitate to replace a damaged part – it’s an investment in your peace of mind and your home’s plumbing system.
Frequently Asked Questions: Disassembling Your Shower Head
Have more questions about how to take apart your shower head? We’ve compiled some common inquiries to help you further.
Why should I take apart my shower head?
Taking apart your shower head is crucial for cleaning mineral buildup. This buildup can restrict water flow and diminish your shower experience. Disassembly allows for thorough cleaning and restoration.
What tools do I need to take apart my shower head?
Typical tools include adjustable wrench, pliers (optional), toothbrush, white vinegar, and possibly a small flat-head screwdriver. Having the right tools makes it much easier to take apart shower head components safely.
How often should I take apart and clean my shower head?
Ideally, you should clean your shower head every 3-6 months, depending on your water hardness. Regularly taking apart shower head parts prevents significant buildup and maintains optimal performance.
What if I can’t get the shower head to unscrew?
Try applying penetrating oil to the threads and let it sit for a few minutes. Gentle tapping with a rubber mallet might also help. Be careful not to damage the shower arm or the shower head itself when learning how to take apart shower head effectively.
So, there you have it! Taking apart your shower head isn’t as scary as it sounds, right? Now you know how to take apart shower head and keep that water flowing smoothly. Go ahead and give it a try; your shower (and your hair!) will thank you!