A watch bracelet, often connected by pins and links, requires adjustment for optimal comfort. Many individuals, equipped with a simple watch link removal tool, learn how to shorten a watch link at home. Understanding the specific mechanism, like the ones used by brands such as Rolex, is key to safely adjusting the length. A proper fit ensures the watch sits correctly on your wrist, preventing it from sliding excessively and maintaining its aesthetic appeal.
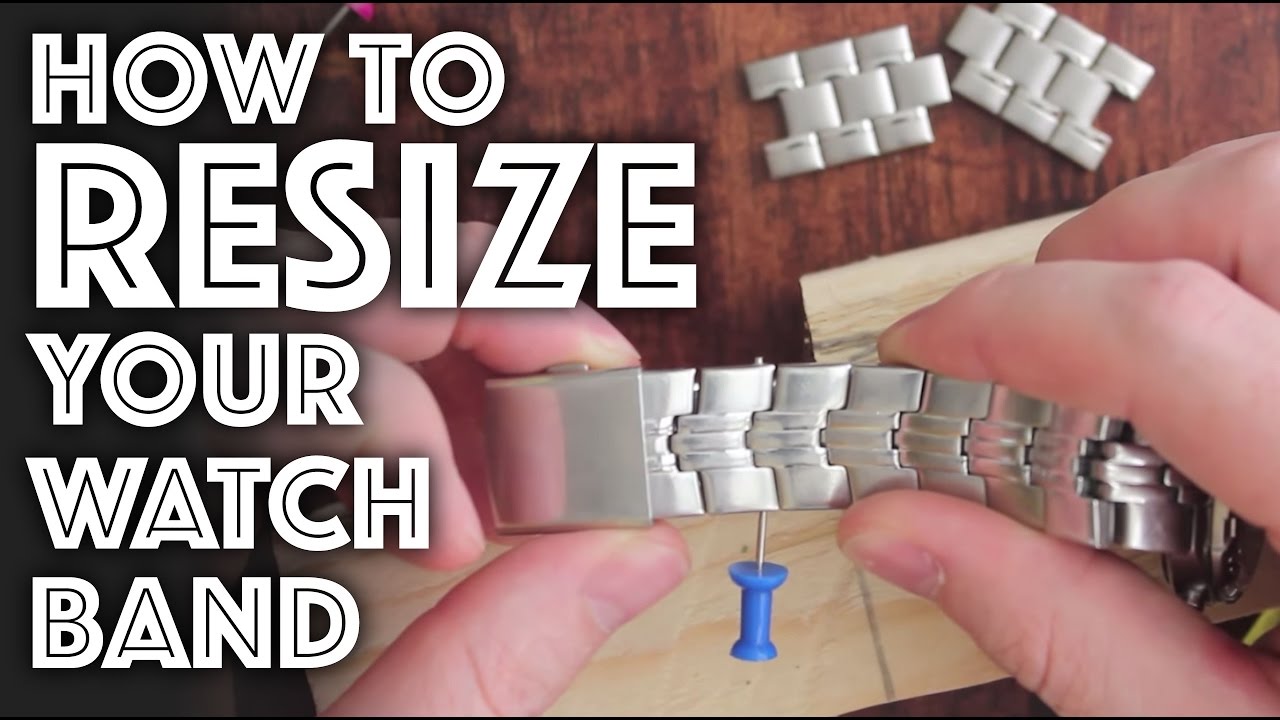
Image taken from the YouTube channel LRN2DIY , from the video titled How to Resize / Adjust a Watch Band .
Achieving the Perfect Watch Fit: A Matter of Comfort and Style
A watch isn’t just a time-telling device; it’s an extension of your personal style, a statement piece that complements your look. But a watch, no matter how stylish, loses its appeal if it doesn’t fit properly. A poorly fitted watch can be uncomfortable, distracting, and even appear unprofessional.
The Importance of a Well-Fitted Watch Bracelet
A watch bracelet that’s too tight can restrict blood flow, causing discomfort and leaving unsightly marks on your wrist. Conversely, a bracelet that’s too loose will slide around, making it difficult to read the time and potentially damaging the watch itself. The goal is a fit that’s snug enough to stay in place, but loose enough to allow for comfortable movement.
Why Adjust Your Watch Yourself?
While a jeweler can certainly adjust your watch band, there are several advantages to learning how to do it yourself. First and foremost, you save money. Jeweler fees can add up, especially if you frequently switch between watches or need to make minor adjustments.
More importantly, you gain control over the fit. You can experiment with different link configurations until you find the perfect balance of comfort and security. Finally, the satisfaction of mastering a new skill and taking care of your own belongings is immeasurable.
Link Removal and Sizing for Optimal Comfort
The key to achieving the perfect fit lies in understanding link removal and sizing. Most metal watch bracelets are made up of removable links, which allow you to adjust the length of the band to match your wrist size. By carefully removing or adding links, you can fine-tune the fit until it feels just right.
A World of Watch Bands: Different Styles, Different Adjustments
Not all watch bands are created equal. Metal bracelets are the most common type that requires link removal, but you’ll also encounter leather straps, NATO straps, rubber straps, and more. Each type has its own unique adjustment method. Leather straps typically have buckle holes, while NATO straps can be adjusted by sliding the watch head along the strap. This guide will primarily focus on adjusting metal link bracelets, but we’ll touch on other types as well.
Get ready to take control of your watch’s fit! The following step-by-step guide will equip you with the knowledge and skills you need to confidently adjust your watch bracelet and enjoy the perfect fit every time you wear your favorite timepiece.
Gather Your Tools: Essential Equipment for Watch Link Removal
Once you’ve decided to take the plunge and adjust your watch bracelet yourself, the next crucial step is assembling the right tools. Attempting to remove links without the proper equipment is a recipe for frustration, potential damage to your watch, and even personal injury.
Having the correct tools not only makes the process easier and more efficient but also significantly reduces the risk of scratching or damaging your prized timepiece.
Essential Tools for Shortening a Watch Link
Here’s a breakdown of the essential tools you’ll need, along with explanations of their specific functions:
-
Watch Link Removal Tool: This tool is designed to push out the pins that connect the links in most metal watch bracelets. It typically features a small, adjustable pusher pin that aligns with the pin in the link. By turning a screw mechanism, the pusher pin presses against the link pin, forcing it out of the bracelet.
-
Push Pin Tool: This tool is similar to the watch link removal tool, but it’s typically smaller and more pointed. It’s especially useful for fine adjustments and for pushing out pins that are particularly stubborn or recessed. Some bracelets, particularly those with tighter tolerances, are more easily managed with a push pin tool than a bulkier link removal tool.
-
Hammer and Pin Punch Set: While not always necessary, a hammer and pin punch set can be invaluable for removing particularly tight or stubborn pins. The set typically includes several small metal punches of varying diameters. You place the punch against the link pin and gently tap it with a small hammer to drive the pin out. Exercise extreme caution when using a hammer, as excessive force can easily damage the bracelet.
-
Small Screwdriver: Some watch bracelets, particularly those found on higher-end watches, use small screws instead of pins to connect the links. A set of small screwdrivers, including a size that precisely fits these screws, is essential for removing and reattaching these links. Attempting to use the wrong size screwdriver can easily strip the screw head, making removal impossible.
-
Spring Bar Tool: This tool, also known as a spring bar remover, is necessary to detach the watch bracelet from the watch case itself. It features a forked end that is used to compress the spring bars, small spring-loaded pins that hold the bracelet in place. Compressing these bars allows you to safely remove the bracelet without damaging the watch or the bracelet.
The Importance of a Clean Workspace and Protection
Beyond the specific tools, a clean, well-lit workspace is crucial. Clear away any clutter and ensure you have ample space to work comfortably.
Most importantly, always use a soft microfiber cloth to protect the watch case and bracelet from scratches during the adjustment process. Lay the cloth down on your work surface and place the watch on top of it. This simple precaution can prevent unsightly marks and maintain the value of your watch.
Step-by-Step: Removing Watch Links Like a Pro
Now that you’ve gathered your tools, it’s time to put them to use. This section provides a detailed walkthrough of how to remove watch links, transforming your ill-fitting timepiece into a comfortable and stylish accessory. Whether you’re a seasoned DIY enthusiast or a first-time watch adjuster, these instructions will guide you through the process with clarity and precision.
Preparing the Watch
Before you even think about touching any tools to your watch, preparation is key. This initial stage is crucial for preventing scratches and setting yourself up for a smooth, successful link removal.
First, create a safe workspace. Lay down your microfiber cloth on a flat, stable surface. This will act as a protective barrier, preventing scratches to the watch case, bracelet, and even your work surface.
Next, take a close look at your bracelet. Most bracelets that are designed for link removal will have small arrows etched on the inside of the links. These arrows indicate the direction in which the pins need to be pushed out. It’s important to work on these removable links only; attempting to remove non-removable links could cause damage.
Removing Links with a Watch Link Removal Tool
The watch link removal tool is often the first choice for adjusting metal bracelets. Its design provides a controlled and relatively safe method for ejecting the pins.
-
Position the Bracelet: Place the watch bracelet into the link removal tool so that the pin you want to remove is aligned with the tool’s pusher pin. Make sure the arrow on the link (if present) points toward the tool’s pusher pin – this ensures you are pushing the pin out in the correct direction.
-
Align the Pusher Pin: Carefully adjust the tool so that the pusher pin is perfectly centered on the link pin you intend to remove. Misalignment can bend or break the pusher pin.
-
Apply Pressure: Slowly turn the handle of the link removal tool. You should see the link pin begin to protrude from the other side of the bracelet. If the pin is particularly stubborn, don’t force it. Double-check your alignment and try again with a gentle, steady pressure.
-
Remove the Pin: Once the pin is far enough out, use your fingers or a pair of tweezers to gently pull it completely free from the link. Keep the pin in a safe place as you’ll need it later to reassemble the bracelet.
Removing Links with a Hammer and Pin Punch Set
For those particularly stubborn pins that refuse to budge with the link removal tool, a hammer and pin punch set can provide the extra force needed. However, proceed with extreme caution. This method carries a higher risk of scratching or damaging your watch if not done correctly.
-
Support the Bracelet: Place the bracelet on a sturdy surface, ideally a small watchmaker’s anvil or a block of wood with a small indentation to support the link.
-
Position the Punch: Select a pin punch that is slightly smaller than the diameter of the link pin. Carefully position the punch on top of the link pin, ensuring it is aligned straight.
-
Tap Gently: Using a light hammer, gently tap the end of the pin punch. Use light taps to avoid bending the pin or damaging the surrounding bracelet. The goal is to gradually push the pin out, not to force it with one powerful blow.
-
Remove the Pin: Once the pin is protruding enough, use pliers or tweezers to pull it completely out. Again, be careful not to scratch the bracelet.
Removing Links with a Push Pin Tool
The push pin tool offers a more direct approach to removing stubborn pins.
-
Position and Align: As with the other methods, ensure your watch is stable and protected. Align the tip of the push pin tool directly against the link pin you want to remove. Ensure the arrow on the link points toward the direction you are pushing.
-
Apply Steady Pressure: Use a firm, steady pressure to push the pin out. The key is to avoid jerky movements that could cause the tool to slip and scratch the bracelet.
-
Extract the Pin: Once the pin has been pushed out far enough to grip, carefully pull it free using tweezers or your fingers.
Removing Links with a Screwdriver
Some watch bracelets use screws instead of pins to connect the links. These are typically found on higher-end watches. Removing these links is straightforward, but requires a correctly sized screwdriver.
-
Select the Right Screwdriver: Use a small screwdriver that perfectly fits the screw head. Using the wrong size can strip the screw head, making it impossible to remove.
-
Unscrew Carefully: Gently turn the screwdriver to loosen and remove the screw. It’s best to work over a tray or other container to prevent the tiny screws from getting lost.
-
Remove the Link: Once the screws are removed, the link should easily separate from the bracelet.
Reattaching the Watch Bracelet to the Watch Clasp
With the necessary links removed, it’s time to reassemble the bracelet and connect it to the watch clasp.
-
Rejoin the Bracelet: Bring the two ends of the bracelet together, aligning the holes for the pins or screws.
-
Reinsert the Pins/Screws: Carefully reinsert the pins or screws, ensuring they are facing the correct direction (if applicable). For pins, you may need to use the link removal tool or hammer and pin punch to gently tap them back into place. For screws, tighten them securely, but be careful not to over-tighten and strip the threads.
-
Check the Connection: Once the bracelet is reassembled, give it a gentle tug to ensure the connection is secure. There should be no looseness or gaps between the links. If the bracelet feels unstable, double-check that the pins or screws are properly seated and tightened.
Fine-Tuning the Fit: Achieving Maximum Comfort
Removing links is only half the battle. The ultimate goal is a watch that feels like an extension of yourself, not a constricting bracelet. This section guides you through the crucial steps of achieving that perfect, comfortable fit.
Measuring Your Wrist Size
Accuracy is paramount. Guesswork often leads to an ill-fitting watch, necessitating further adjustments.
The most precise method involves using a flexible measuring tape. Wrap the tape snugly around your wrist where you would normally wear your watch. Note the circumference in millimeters or inches. This provides a baseline measurement for achieving the ideal fit.
Alternatively, if you don’t have a measuring tape, use a strip of paper or string. Mark the point where it overlaps around your wrist, then measure the length of the paper or string with a ruler.
Remember to measure the wrist you intend to wear the watch on, as there can be slight differences between your dominant and non-dominant wrist.
Adding or Removing Links for Proper Fit
Now, put that measurement to work. After removing links, try on the watch.
The goal is to achieve a fit that is snug but not tight. You should be able to slide a finger comfortably between the bracelet and your wrist.
If the watch is too tight, you’ll need to add back a link. If it’s too loose, remove another. Make adjustments incrementally, one link at a time, until you achieve the desired comfort level.
Also, consider the watch head itself. The size of the watch face impacts the overall fit. A larger watch head may require removing one less link, whereas a smaller watch head might need the removal of one more.
Even the distribution of removed links matters. Aim for symmetry. Remove an equal number of links from both sides of the clasp to keep the watch face centered on your wrist and to prevent the clasp from digging into your skin.
Considering the Watch Clasp Adjustment
Many watch clasps offer an additional level of fine-tuning through micro-adjustment holes.
These small holes allow you to subtly alter the bracelet length without removing or adding links.
Locate the spring bar within the clasp. Using your spring bar tool, gently depress the spring bar and move it to a different hole.
Experiment with different settings until you find the position that provides the most comfortable and secure fit.
This micro-adjustment can be particularly useful for accommodating slight changes in wrist size due to temperature fluctuations or activity levels.
Safety First: Tips and Precautions for Watch Adjustment
Adjusting your watch bracelet at home can be a rewarding experience, saving you time and money. However, it’s crucial to approach this task with the utmost care and attention to detail. A moment’s carelessness can lead to scratches, a damaged watch, or even personal injury. This section highlights the essential safety precautions and maintenance tips to ensure a smooth and risk-free watch adjustment process.
Prioritizing Safety During Adjustment
The delicate nature of watch mechanisms and small components requires a mindful approach. Before you even pick up a tool, consider these safety aspects:
Avoiding Excessive Force
One of the most common mistakes is applying too much force. Never force a pin, screw, or link. If something isn’t budging easily, re-evaluate your technique and ensure you’re using the correct tool and approach. Excessive force can bend pins, strip screws, or even damage the bracelet itself.
The Importance of a Steady Hand and Good Lighting
Adequate lighting is paramount. A well-lit workspace allows you to clearly see what you’re doing and avoid accidental slips. Similarly, a steady hand is crucial for precise movements.
If you’re feeling tired or shaky, it’s best to postpone the adjustment until you’re more focused. Rushing or working with unsteady hands significantly increases the risk of errors and damage.
Seeking Professional Help: When to Defer to Experts
While many watch adjustments can be done at home, there are situations where seeking professional help is the wisest course of action.
Identifying Complex Mechanisms
If you’re dealing with a particularly intricate or high-end watch, or if you’re unsure about the adjustment process, it’s best to consult a jeweler or watch repair shop. Attempting to adjust a complex mechanism without the proper knowledge can result in irreversible damage.
When DIY Attempts Fail
If you encounter persistent difficulties, such as a stubborn pin that won’t budge or a stripped screw, don’t continue to force the issue. A professional has the tools and expertise to address these problems without causing further harm.
Dealing with Vintage or Delicate Watches
Vintage watches often have fragile components that require specialized care. Adjusting the bracelet on a vintage watch yourself carries a higher risk of damage due to the age and potential deterioration of the materials. Leave it to the professionals.
Maintaining Your Watch Bracelet: Longevity and Aesthetics
Proper maintenance is key to preserving the beauty and functionality of your watch bracelet. Regular cleaning and careful handling can significantly extend its lifespan.
Regular Cleaning Practices
Dust, dirt, and sweat can accumulate on your watch bracelet over time, dulling its appearance and potentially causing corrosion. Clean your bracelet regularly with a soft, damp cloth. For more thorough cleaning, you can use a mild soap and water solution, ensuring you rinse and dry the bracelet completely afterward.
Avoiding Harsh Chemicals and Abrasives
Never use harsh chemicals, abrasive cleaners, or ultrasonic cleaners on your watch bracelet, unless specifically recommended by the manufacturer. These can damage the finish and compromise the integrity of the metal.
Storage Considerations
When you’re not wearing your watch, store it in a safe place, away from extreme temperatures and humidity. Consider using a watch box or pouch to protect it from scratches and dust.
By adhering to these safety precautions and maintenance tips, you can confidently adjust your watch bracelet and enjoy its perfect fit for years to come. Remember, patience and caution are your best allies in this process.
FAQs About Shortening Watch Links
Here are some frequently asked questions to help you better understand how to shorten a watch link and achieve a perfect fit.
Why would I need to shorten a watch link?
Watch bracelets often come with extra links to accommodate larger wrists. If your watch is too loose, shortening the watch link by removing links will improve comfort and prevent the watch from sliding around.
What tools do I need to shorten a watch link myself?
Generally, you’ll need a watch link removal tool (or a small, sturdy pin), a small hammer (optional), and a soft cloth to protect the watch. Having a pair of pliers can also be helpful for stubborn pins. Successfully how to shorten a watch link depends on having the right tools!
How do I know how many links to remove when I shorten a watch link?
Try on the watch and pinch the bracelet together where it overlaps. Estimate the number of links this represents. Remove that number of links, then try the watch on again. Repeat as needed until you achieve a comfortable fit. Remember to remove links evenly from both sides of the clasp for balance.
What if I’m not comfortable shortening a watch link myself?
If you’re not confident, it’s always best to take your watch to a professional jeweler or watch repair shop. They have the experience and tools to safely shorten a watch link without damaging your timepiece.
Alright, you’ve got the know-how! Now go shorten that watch link and enjoy a perfectly fitted timepiece. Happy tinkering!