Understanding plumbing systems is crucial for any homeowner. This includes knowing how various materials interact, especially when transitioning from modern PVC to older systems like cast iron. This DIY connection guide will provide a detailed explanation of how to safely and effectively connect pvc to cast iron. By the end of this article, you will understand how to properly use a rubber coupling to ensure a secure, leak-proof connection.
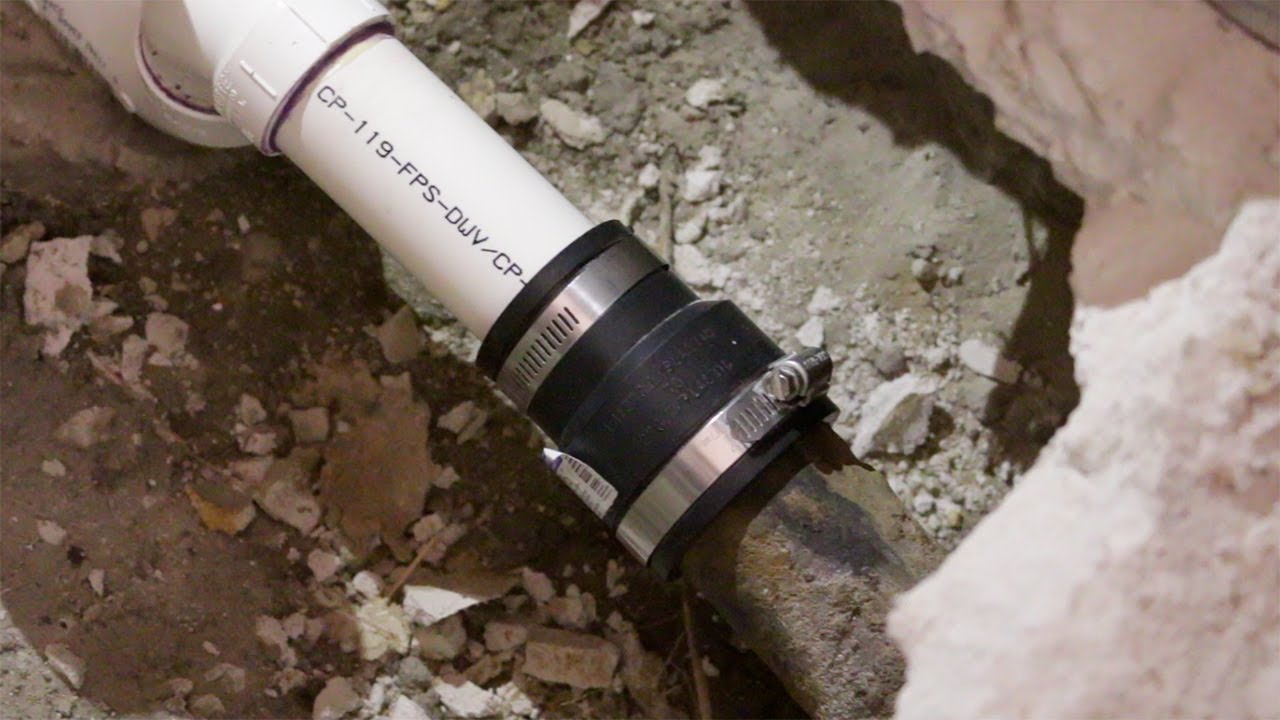
Image taken from the YouTube channel CreativeProcessDIY , from the video titled How to connect PVS pipe to Cast Iron Pipe using Fernco Coupling .
Bridging the Gap: Connecting PVC to Cast Iron
In the realm of plumbing, encountering a project that necessitates joining dissimilar materials is far from unusual. One of the most frequent scenarios involves connecting Polyvinyl Chloride (PVC) to cast iron pipes.
This often arises during home renovations, repairs to existing plumbing systems, or when upgrading older cast iron drainage lines with modern PVC. Understanding why this connection is necessary, and how to execute it correctly, is crucial for any homeowner or DIY enthusiast.
The Plumbing Crossroads: PVC Meets Cast Iron
Why do these two materials need to be joined in the first place? Cast iron pipes, known for their durability, were widely used in older homes for drain, waste, and vent (DWV) systems.
As these systems age, cast iron can corrode or crack, requiring replacement. PVC, a cost-effective and easy-to-install alternative, has become the go-to material for many plumbing repairs and new installations.
Therefore, the need to transition from old to new—from cast iron to PVC—becomes a common plumbing challenge. Furthermore, soil conditions or physical damage to the cast iron pipes can cause sections to need replacing with PVC.
The Imperative of a Secure Connection
The success of any plumbing project hinges on the integrity of its connections.
A poorly executed joint between PVC and cast iron can lead to a host of problems, the most obvious being leaks. Even a small leak can cause significant water damage over time, leading to mold growth, structural issues, and costly repairs.
Beyond the immediate concern of water damage, a faulty connection can compromise the entire plumbing system.
Improper drainage, sewer gas leaks, and even the potential for pipe collapse are all risks associated with a subpar connection. Therefore, ensuring a secure, leak-proof joint is paramount for long-term reliability and peace of mind.
Your DIY Guide to a Lasting Connection
This guide aims to equip you with the knowledge and skills necessary to confidently connect PVC to cast iron pipes. We will explore various DIY methods, focusing on ease of use and effectiveness.
Each method will be presented with clear, step-by-step instructions, accompanied by practical tips and insights.
Safety is our top priority. We will emphasize the necessary precautions to take when working with plumbing materials and tools, ensuring a safe and successful project.
By following this guide, you can achieve a reliable and durable connection, saving money on professional plumbing services while gaining valuable DIY skills.
The success of any plumbing endeavor, especially when merging different pipe types, lies in a deep understanding of the materials at hand. Before you begin connecting PVC to cast iron, it’s essential to grasp the properties, strengths, and weaknesses of each material.
This knowledge will guide your choice of connection method and ensure a long-lasting, reliable plumbing system. Let’s delve into the contrasting worlds of PVC and cast iron.
Understanding Your Materials: PVC vs. Cast Iron Pipes
PVC (Polyvinyl Chloride) and cast iron represent distinct eras and philosophies in plumbing. Each material boasts a unique set of characteristics that make it suitable for specific applications. Comparing their strengths and weaknesses is essential for informed decision-making.
PVC Pipe: The Modern Contender
PVC pipe has become a mainstay in modern plumbing due to its versatility and affordability. Its rise in popularity is largely attributable to its ease of installation and resistance to corrosion.
Advantages of PVC Pipe
Cost-effectiveness is one of PVC’s primary appeals. Compared to cast iron, PVC is significantly cheaper, making it a budget-friendly option for many plumbing projects.
Its lightweight nature further simplifies installation. PVC can be easily cut, handled, and joined, reducing labor and time.
Corrosion resistance is another key advantage. Unlike cast iron, PVC doesn’t rust or corrode, ensuring a longer lifespan in many environments. This is especially beneficial in areas with acidic soil or water.
Disadvantages of PVC Pipe
However, PVC is not without its limitations. Its durability is lower than that of cast iron, making it more susceptible to damage from impacts or heavy loads.
PVC is also sensitive to temperature extremes. High temperatures can cause it to soften and deform, while freezing temperatures can make it brittle and prone to cracking.
Cast Iron Pipe: The Durable Veteran
Cast iron pipes, once the standard for DWV (drain, waste, and vent) systems, are known for their robustness and longevity. Although less common in new construction, they remain prevalent in older homes.
Advantages of Cast Iron Pipe
Exceptional durability is the hallmark of cast iron. These pipes can withstand high pressure and resist damage from external forces, ensuring a long service life.
Cast iron also exhibits superior resistance to high temperatures. This makes it suitable for applications where hot water or steam are present.
Noise reduction is another often-overlooked benefit. Cast iron pipes dampen sound more effectively than PVC, leading to quieter plumbing systems.
Disadvantages of Cast Iron Pipe
Despite its advantages, cast iron has significant drawbacks. Its weight makes it difficult to handle and install. Requiring specialized tools and expertise.
Cast iron is prone to corrosion, especially on its interior surface. Over time, rust can accumulate, reducing the pipe’s diameter and flow capacity.
Cutting and connecting cast iron pipes are also more challenging than with PVC. This often necessitates the use of specialized tools and techniques.
The previous sections laid the groundwork for understanding the nuances of PVC and cast iron, highlighting their individual strengths and weaknesses. Now, we shift our focus to the practical aspect: gathering the necessary tools and materials. This step is crucial because having the right equipment not only simplifies the connection process but also ensures a secure and long-lasting bond between the disparate materials.
Gather Your Arsenal: Essential Tools and Materials
Successfully connecting PVC to cast iron requires more than just knowing how to do it; it demands having the right tools and materials at your disposal. This section details each essential item, explaining its purpose and highlighting key considerations for selection. A well-prepared toolkit significantly increases the likelihood of a successful and leak-proof connection.
Priming and Cementing: The Foundation of PVC Connections
For connections involving PVC fittings, PVC primer and PVC cement are indispensable.
PVC primer acts as a cleaning agent, removing dirt and grease from the pipe’s surface. More importantly, it softens the PVC, preparing it for the chemical welding process.
PVC cement then creates a solvent weld, fusing the PVC pipe and fitting together at a molecular level.
When selecting these products, ensure they are compatible with the specific type of PVC you are using (e.g., CPVC cement for CPVC pipes) and always follow the manufacturer’s instructions for application.
Couplings: Bridging the Material Gap
Couplings are the unsung heroes of connecting dissimilar pipes. For PVC to cast iron connections, Fernco couplings and no-hub couplings are the most common and effective choices.
Fernco Couplings (Flexible Couplings)
Fernco couplings, also known as flexible couplings, are made from a flexible elastomeric material, typically rubber.
They are secured with stainless steel clamps, allowing for a degree of flexibility and misalignment between the pipes.
Fernco couplings are available in shielded and unshielded versions. Shielded couplings have a stainless steel sleeve that provides additional support and shear strength, making them suitable for underground applications or areas with high traffic.
Unshielded couplings are more economical but are generally limited to above-ground, non-critical applications.
No-Hub Couplings (Shielded Couplings)
No-hub couplings, also known as shielded couplings, are specifically designed for connecting cast iron pipes. However, they can also be used to connect PVC to cast iron with the appropriate adapters.
These couplings feature a rubber sleeve encased in a stainless steel shield, providing superior strength and resistance to shear forces.
No-hub couplings require the use of a torque wrench to ensure the clamps are tightened to the manufacturer’s specifications, ensuring a leak-proof seal.
They are often preferred for underground installations and situations where maximum durability is required.
When selecting couplings, accurate sizing is critical. Measure the outer diameter of both the PVC and cast iron pipes to ensure a proper fit.
Securing the Connection: Clamps
Clamps are essential for creating a tight, leak-proof seal with both Fernco and No-Hub couplings. High-quality stainless steel clamps are recommended for their corrosion resistance and durability.
Ensure the clamps are the correct size for the coupling and pipe diameters. Over-tightening can damage the coupling, while under-tightening can lead to leaks.
Essential Hand Tools
A few basic hand tools are necessary for preparing and securing the connection.
Screwdriver
A screwdriver, typically a flathead or Phillips head depending on the clamp type, is needed for tightening the clamps on Fernco couplings. Ensure the screwdriver is appropriately sized for the screw heads to prevent slippage and damage.
Wrench
A wrench is used to tighten the nuts on No-Hub coupling clamps. A torque wrench is highly recommended to ensure the clamps are tightened to the manufacturer’s specified torque, preventing both leaks and damage to the coupling.
Hacksaw
A hacksaw is used for cutting the PVC pipe to the required length. A fine-toothed blade is recommended for a clean, smooth cut. For cutting cast iron, while not always necessary, a specialized cast iron cutting blade will significantly ease the process. Safety glasses should always be worn when cutting pipes.
The previous sections laid the groundwork for understanding the nuances of PVC and cast iron, highlighting their individual strengths and weaknesses. Now, we shift our focus to the practical aspect: gathering the necessary tools and materials. This step is crucial because having the right equipment not only simplifies the connection process but also ensures a secure and long-lasting bond between the disparate materials.
Connecting PVC to Cast Iron: A Methodical Approach
Connecting PVC to cast iron requires careful consideration, as the materials’ inherent differences demand specific techniques. Several methods exist, each with its own set of advantages and disadvantages. The selection of the optimal approach hinges on factors like pipe diameter, location, soil conditions, and building codes. This section delves into the primary connection methods: Fernco couplings, No-Hub couplings, and adapters, providing a detailed exploration of their applications and limitations.
Using Fernco Couplings (or Flexible Couplings)
Fernco couplings, also known as flexible couplings, offer a straightforward and adaptable solution for joining dissimilar pipes. Their composition, typically a flexible elastomeric material (such as rubber or PVC) with stainless steel clamps, allows for a degree of misalignment and vibration absorption, making them particularly useful in situations where precision is challenging to achieve.
Step-by-Step Instructions for Fernco Coupling Connection
-
Measure and Cut (if necessary): Begin by accurately measuring the required length of PVC pipe. Cut the pipe squarely using a suitable saw, ensuring a clean, burr-free edge. If the cast iron pipe requires cutting, exercise caution due to its brittle nature.
-
Prepare the Pipes: Thoroughly clean the exterior surfaces of both the PVC and cast iron pipes where the coupling will be placed. Remove any dirt, rust, or debris that could compromise the seal.
-
Position the Coupling: Slide the Fernco coupling over one of the pipes, ensuring that the clamps are loosened adequately.
-
Join the Pipes: Carefully align the two pipes and slide the coupling into place, centering it over the joint. Make sure both pipe ends are fully inserted into the coupling.
-
Tighten the Clamps: Position the stainless steel clamps over the coupling and tighten them evenly using a screwdriver or wrench. Ensure the clamps are snug but not excessively tight to avoid damaging the coupling.
Clamp Placement and Tightening
Proper clamp placement is paramount to a leak-proof connection. Position the clamps equidistant from the joint and ensure they are seated correctly on the coupling surface. Avoid overtightening the clamps, as this can distort the coupling and compromise the seal. The goal is a firm, even pressure around the entire circumference of the pipes.
Fernco Coupling Types and Applications
Fernco couplings are available in shielded and unshielded configurations. Shielded couplings feature a stainless steel shield that provides additional support and protection against shear forces. They are generally preferred for underground applications or situations where the joint may be subjected to external stresses. Unshielded couplings are suitable for above-ground connections or in areas where minimal stress is expected.
Using No-Hub Couplings (Shielded Couplings)
No-Hub couplings, also known as shielded couplings, offer a robust and reliable connection, especially in demanding environments. These couplings consist of a rubber sleeve encased in a stainless steel shield, providing exceptional strength and resistance to shear forces. They are frequently used in underground plumbing systems and commercial applications.
Connecting PVC and Cast Iron with No-Hub Couplings: A Detailed Guide
-
Prepare the Pipes: As with Fernco couplings, thorough cleaning and deburring of the pipe ends are essential.
-
Position the Coupling: Slide the No-Hub coupling over one of the pipes, ensuring the clamps are loosened.
-
Join the Pipes: Align the pipes and slide the coupling into place, centering it over the joint. Ensure that the pipe ends are fully inserted.
-
Tighten the Clamps: Using a calibrated torque wrench, tighten the clamps to the manufacturer’s specified torque. This step is crucial for achieving a proper seal and preventing leaks.
The Importance of Torque Wrench
Using a torque wrench is non-negotiable when working with No-Hub couplings. Overtightening can damage the coupling or the pipes, while undertightening can lead to leaks. Adhering to the manufacturer’s torque specifications ensures a secure and reliable connection.
Preferred Applications for No-Hub Couplings
No-Hub couplings are the gold standard for underground connections due to their superior strength and resistance to shear forces. They are also commonly used in commercial and industrial plumbing systems where reliability is paramount.
Using Adapters
Adapters provide a direct transition between PVC and cast iron pipes, offering an alternative to couplings. These fittings are typically threaded or solvent-weld, allowing for a more rigid connection.
Types of Adapters
-
Threaded Adapters: These adapters feature threads on one end for connecting to a threaded cast iron pipe and a solvent-weld socket on the other end for connecting to PVC.
-
Solvent-Weld Adapters: These adapters are designed to be solvent-welded to both the PVC pipe and a compatible fitting on the cast iron side. However, directly solvent-welding to cast iron is generally not recommended due to the material’s incompatibility with PVC cement.
When to Use Adapters Instead of Couplings
Adapters are often preferred when space is limited, or a more rigid connection is desired. They can also be useful when transitioning between different pipe sizes. However, it’s crucial to ensure compatibility between the adapter and the existing plumbing system.
The previous sections laid the groundwork for understanding the nuances of PVC and cast iron, highlighting their individual strengths and weaknesses. Now, we shift our focus to the practical aspect: gathering the necessary tools and materials. This step is crucial because having the right equipment not only simplifies the connection process but also ensures a secure and long-lasting bond between the disparate materials.
Step-by-Step Guide: Making the Connection
Connecting PVC to cast iron pipes doesn’t have to be a daunting task. By methodically combining the best practices discussed earlier, you can achieve a reliable, leak-proof connection. This section provides a comprehensive, step-by-step guide, walking you through each stage of the process.
Preparing the Pipes: The Foundation for a Solid Connection
Proper pipe preparation is paramount. Begin by thoroughly cleaning both the PVC and cast iron pipes. Remove any dirt, debris, rust, or old sealant using a wire brush or emery cloth.
Ensure the pipe ends are free from any contaminants that could compromise the connection.
Next, address any burrs or sharp edges resulting from cutting. Deburring tools or a file can smooth these imperfections, creating a flush, even surface for the coupling or adapter to grip.
Finally, dry-fit the coupling or adapter to confirm a proper fit before proceeding. This ensures that the pipes align correctly and that the connection will be secure. Never force a connection; if it’s too tight, reassess the pipe dimensions or consider a different coupling size.
Applying PVC Primer and Cement: When and How
If you’re using solvent-weld adapters to connect the PVC to cast iron, proper application of PVC primer and cement is critical. These chemicals create a chemical bond between the PVC pipe and the adapter, ensuring a strong, leak-proof seal.
Always work in a well-ventilated area when using primer and cement, as they emit fumes that can be harmful.
Apply the primer evenly to both the inside of the adapter and the outside of the PVC pipe using the applicator included with the primer. The primer softens the PVC, preparing it for the cement.
Immediately apply the PVC cement to both surfaces, again using the applicator. Work quickly, as the cement sets rapidly.
Insert the PVC pipe into the adapter, giving it a slight twist to ensure even distribution of the cement. Hold the connection firmly for about 30 seconds to allow the cement to set.
Allow the connection to cure completely according to the manufacturer’s instructions before applying any pressure or testing for leaks.
Installing the Coupling: Alignment and Positioning
Whether you’re using a Fernco coupling or a No-Hub coupling, proper alignment is essential for a secure connection. Slide the coupling onto one of the pipes, positioning it so that it overlaps both the PVC and cast iron pipes equally.
Ensure that the coupling is centered over the joint and that the pipes are aligned straight. Misalignment can create stress on the connection and increase the risk of leaks.
Securing the Connection: Tightening the Clamps
The final step is securing the connection by tightening the clamps on the coupling. For Fernco couplings, use a screwdriver to tighten the clamps evenly, alternating between each side. Avoid overtightening, as this can damage the coupling or the pipes.
For No-Hub couplings, it’s crucial to use a torque wrench to tighten the clamps to the manufacturer’s specified torque. Overtightening or undertightening can compromise the seal. A torque wrench ensures consistent and accurate tightening, preventing leaks and ensuring a long-lasting connection.
The previous sections laid the groundwork for understanding the nuances of PVC and cast iron, highlighting their individual strengths and weaknesses. Now, we shift our focus to the practical aspect: gathering the necessary tools and materials. This step is crucial because having the right equipment not only simplifies the connection process but also ensures a secure and long-lasting bond between the disparate materials.
Plumbing Essentials: Ensuring Proper Drainage
Connecting PVC to cast iron is only one piece of the plumbing puzzle. Ensuring proper drainage after the connection is crucial for the overall functionality and longevity of your plumbing system. Neglecting these fundamental principles can lead to slow drains, backups, and potentially costly repairs down the line.
This section delves into the critical plumbing considerations that must be addressed to guarantee effective drainage, including maintaining proper slope, understanding the sewer line connection, and recognizing the importance of adequate venting.
Maintaining Proper Slope: The Key to Gravity’s Assistance
A fundamental principle of drainage systems is relying on gravity to efficiently move wastewater away from your home. This is achieved through maintaining a consistent and correct slope throughout the drain lines.
The Importance of Consistent Fall
The slope, or pitch, refers to the gradual decline of the drainpipe as it travels toward the main sewer line. A consistent slope ensures that solids and liquids are carried along together, preventing solids from settling and causing clogs.
Calculating and Achieving the Ideal Slope
The generally accepted standard for drainpipe slope is 1/4 inch per foot. This means that for every foot of horizontal pipe run, the pipe should drop a quarter of an inch in elevation.
Accurate measurement is crucial for achieving the correct slope. Use a level to establish a horizontal reference point, and then measure the drop over a defined distance. Shims or adjustable pipe supports can be used to fine-tune the slope and maintain the necessary pitch.
Understanding the Sewer Line Connection: The Destination of Wastewater
The sewer line serves as the ultimate destination for all wastewater leaving your property. A clear understanding of its location, depth, and connection point is essential for a successful and compliant plumbing installation.
Identifying the Sewer Line
Before making any connections, locate the main sewer line. This is often done by consulting property records or contacting your local utility company.
Knowing the sewer line’s depth is vital for ensuring that your drain lines have sufficient fall to connect properly. An insufficient drop can result in backflow and drainage problems.
Making the Connection Safely and Legally
Connections to the main sewer line must comply with local plumbing codes and regulations. In many jurisdictions, a permit is required before any work can begin.
Improper connections can lead to environmental hazards and legal penalties. It’s often advisable to consult with a licensed plumber to ensure compliance and a secure connection.
The Vital Role of Venting: Preventing Vacuum Lock
Venting is an often-overlooked but absolutely critical component of a properly functioning drain system. Vent pipes allow air to enter the drain lines, preventing a vacuum from forming that could impede water flow.
How Venting Works
As water flows down a drainpipe, it creates a negative pressure behind it. Without venting, this negative pressure can siphon water out of the traps of other fixtures, such as sinks and toilets, leaving them vulnerable to sewer gases.
Vent pipes extend from the drain lines to the outside of the building, typically through the roof. This allows air to enter the system, equalizing the pressure and ensuring smooth, unobstructed drainage.
Consequences of Inadequate Venting
Insufficient venting can manifest in several ways, including:
- Slow-draining fixtures
- Gurgling sounds from drains
- Unpleasant odors from sewer gases
- Siphoning of water from toilet bowls
If you experience any of these symptoms, it may be an indication of a venting problem that requires professional attention.
The previous sections laid the groundwork for understanding the nuances of PVC and cast iron, highlighting their individual strengths and weaknesses. Now, we shift our focus to the practical aspect: gathering the necessary tools and materials. This step is crucial because having the right equipment not only simplifies the connection process but also ensures a secure and long-lasting bond between the disparate materials.
Leak-Proof Guarantee: Sealing and Testing
A successful plumbing connection isn’t truly complete until you’ve verified its integrity. Ensuring a leak-proof seal is paramount to preventing water damage, conserving water, and avoiding costly repairs down the line. This section provides a comprehensive guide to sealing and testing your PVC to cast iron connection, giving you the confidence that your work will stand the test of time.
The Importance of Thorough Inspection
Before subjecting your connection to the rigors of a water test, a meticulous visual inspection is your first line of defense. Take the time to carefully examine every inch of the connection, paying close attention to the following:
-
Coupling Alignment: Ensure the coupling is centered over the joint between the PVC and cast iron pipes. Misalignment can create stress points and potential leak paths.
-
Clamp Placement: Verify that the clamps are positioned correctly, typically centered over the coupling ends.
-
Visible Gaps: Scrutinize the connection for any visible gaps or openings between the pipes and the coupling. Even small gaps can lead to significant leaks under pressure.
-
Material Condition: Check for any signs of damage to the coupling or pipes, such as cracks, tears, or corrosion. Replace any compromised components before proceeding.
Conducting the Water Test
Once you’ve completed your visual inspection, it’s time to put your connection to the test with a water pressure test. This simple procedure will reveal any hidden leaks and allow you to address them proactively.
Here’s how to conduct a water test:
-
Isolate the Connection: Ensure that the section of pipe containing the new connection is isolated from the rest of the plumbing system. This can be achieved by closing valves upstream and downstream of the connection.
-
Slowly Introduce Water: Gradually introduce water into the isolated section of pipe, being careful to avoid sudden pressure surges.
-
Observe for Leaks: Carefully observe the connection points for any signs of water leakage. Look for drips, trickles, or dampness around the coupling and pipe joints.
-
Maintain Pressure: Maintain the water pressure for a sufficient period, typically 15-30 minutes, to allow any leaks to manifest.
Addressing Leaks: Tightening and Sealing
If you discover a leak during the water test, don’t panic. In many cases, leaks can be resolved with a simple tightening of the clamps. Use a torque wrench to tighten the clamps to the manufacturer’s recommended specifications. Avoid overtightening, as this can damage the coupling or pipes.
If tightening the clamps doesn’t resolve the leak, you may need to apply a plumbing sealant. Before applying sealant, ensure the area is clean and dry. Carefully apply a thin, even layer of sealant around the joint between the pipe and the coupling, following the manufacturer’s instructions. Allow the sealant to cure completely before retesting the connection.
In persistent cases, consider replacing the coupling entirely. There may be an unseen flaw or a slight imperfection.
The Final Inspection: Peace of Mind
After addressing any leaks and allowing any sealant to cure, repeat the water test to ensure that the connection is now leak-free. Once you’re confident that the connection is secure and watertight, you can open the isolation valves and return the plumbing system to normal operation. This final inspection provides peace of mind, knowing that your connection is reliable and will protect your home from water damage.
The previous sections laid the groundwork for understanding the nuances of PVC and cast iron, highlighting their individual strengths and weaknesses. Now, we shift our focus to the practical aspect: gathering the necessary tools and materials. This step is crucial because having the right equipment not only simplifies the connection process but also ensures a secure and long-lasting bond between the disparate materials.
Safety First: Protecting Yourself During Plumbing Projects
Plumbing projects, while often manageable for the DIY enthusiast, inherently involve certain risks. Sharp tools, potentially hazardous chemicals, and the possibility of unexpected leaks demand a strong commitment to safety. Neglecting safety precautions can lead to injuries, health problems, and project setbacks. Therefore, prioritizing your well-being is not just good practice, it’s essential for a successful and safe plumbing endeavor.
The Importance of Personal Protective Equipment (PPE)
Investing in and consistently using appropriate Personal Protective Equipment (PPE) is the cornerstone of safe plumbing work. PPE acts as a barrier between you and potential hazards, minimizing the risk of injury and exposure to harmful substances.
Eye Protection: Shielding Against Projectiles and Splashes
Safety glasses or goggles are non-negotiable when working with pipes, cutting tools, and chemicals. Debris, shavings, and splashes of primer or cement can cause serious eye damage.
Ensure your eye protection is ANSI-rated (American National Standards Institute) to provide adequate impact resistance.
Hand Protection: Guarding Against Cuts and Irritants
Gloves protect your hands from cuts, abrasions, and chemical burns. Choose gloves appropriate for the task at hand.
For general plumbing work, sturdy work gloves made of leather or synthetic materials offer good protection and dexterity. When working with PVC primer and cement, opt for chemical-resistant gloves made of nitrile or neoprene to prevent skin irritation and absorption of harmful chemicals.
Ventilation: Mitigating Chemical Exposure
PVC primer and cement contain volatile organic compounds (VOCs) that can be harmful if inhaled. Working in a well-ventilated area is crucial to minimize exposure to these fumes.
Open windows and doors to create cross-ventilation. If natural ventilation is insufficient, consider using a fan to circulate the air. For prolonged or particularly confined work, a respirator with an organic vapor cartridge may be necessary. Always follow the manufacturer’s instructions and safety data sheets (SDS) for specific ventilation recommendations.
Tool Safety: Preventing Injuries
Plumbing tools, while indispensable, can also be hazardous if used improperly. Familiarize yourself with the safe operating procedures for each tool before use.
Cutting Tools: Exercise Caution
Hacksaws and pipe cutters should be used with care to avoid cuts. Always use a sharp blade and maintain a firm grip on the tool. When cutting pipes, secure them properly to prevent them from moving or slipping.
Wrenches and Clamps: Avoiding Strain and Over-Tightening
Use the correct size wrench for the task and avoid over-tightening connections. Over-tightening can damage fittings and lead to leaks. Be mindful of your posture and avoid straining your back when using wrenches or clamps.
General Tool Handling: Best Practices
Keep your tools clean and in good working condition. Store them in a safe place when not in use. Never use a tool for a purpose for which it was not designed. If you are unsure about how to use a tool safely, consult the manufacturer’s instructions or seek guidance from a qualified professional. By adhering to these safety precautions, you can significantly reduce the risk of injury and ensure a safer, more successful plumbing project.
FAQs: PVC to Cast Iron Connections
Got questions about connecting PVC to cast iron? Here are some common inquiries and answers to help you with your DIY project.
What is the best fitting to use when connecting PVC to cast iron pipe of different sizes?
A flexible coupling, often a rubber coupling with stainless steel clamps, is the best choice. These couplings can accommodate slight differences in diameter and material. They create a watertight seal between the PVC and cast iron, even if the pipes aren’t perfectly aligned.
Can I glue PVC directly to cast iron?
No, you cannot glue PVC directly to cast iron. The two materials have vastly different properties and require a mechanical connection. Using glue will not create a reliable or long-lasting seal and could lead to leaks.
What preparation is required for the cast iron pipe before connecting PVC?
Thorough cleaning is key. Remove any rust, debris, or old sealant from the cast iron pipe using a wire brush. A clean surface ensures a proper seal with the coupling you’re using to connect the PVC to cast iron.
How do I prevent leaks when connecting PVC to cast iron?
Ensure the flexible coupling is properly tightened according to the manufacturer’s instructions. Overtightening can damage the coupling, while undertightening can lead to leaks. Also, make sure both the PVC and cast iron pipe ends are cut cleanly and are free of any burrs to allow for a perfect seal.
Alright, now you’re armed with the knowledge to tackle that pvc to cast iron connection! Go get those tools ready and good luck with your project! Hopefully, this guide made the process a little less daunting!