Embarking on a bathroom renovation project involving your Moen shower can be exciting, but avoiding costly mistakes is paramount. The process of learning how to install Moen shower handle correctly involves understanding the specific components provided by Moen Incorporated. This guide is designed to provide clarity and prevent common pitfalls during how to install Moen shower handle that often lead to unexpected expenses and frustration.
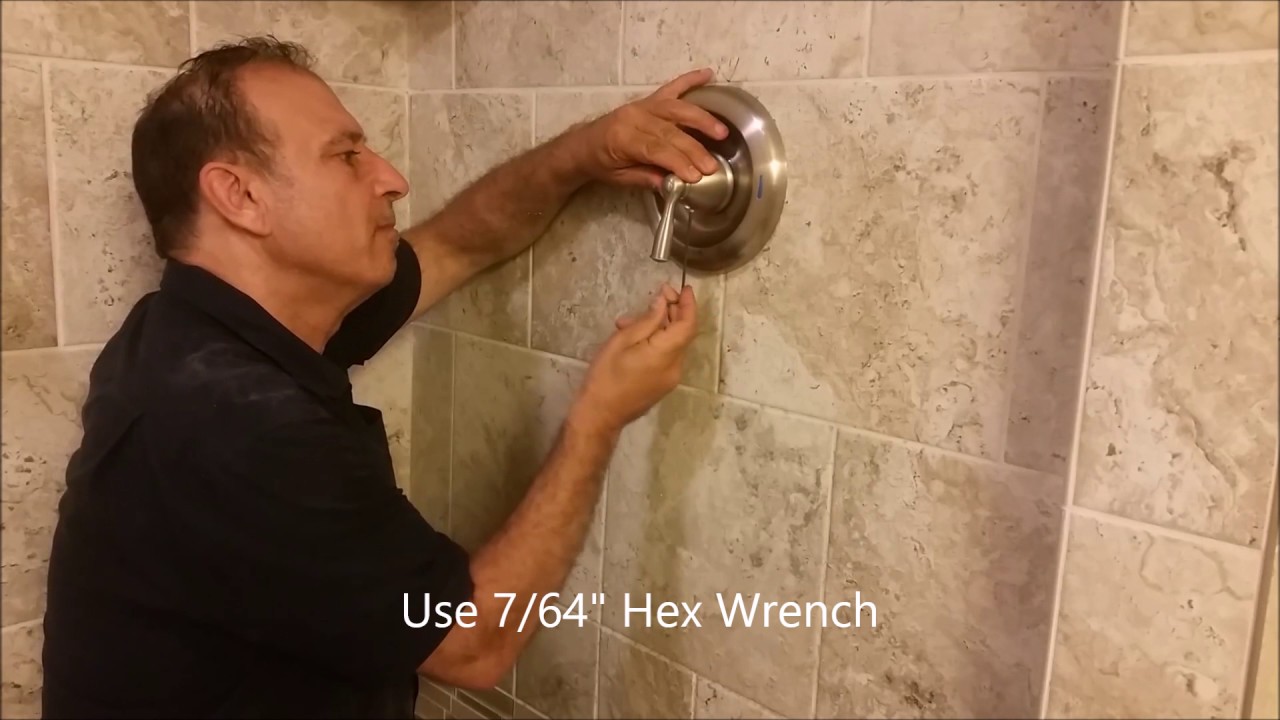
Image taken from the YouTube channel Joseph K , from the video titled How To Install A Moen Shower Faucet – Step By Step – D.I.Y .
Mastering Your Moen Shower Handle Installation
The seemingly simple task of installing a Moen shower handle can be deceptively complex. While it might appear straightforward, a lack of attention to detail or a misunderstanding of the underlying mechanisms can lead to a host of problems.
A properly installed handle isn’t just about aesthetics; it’s about ensuring the longevity and functionality of your entire shower system.
The Significance of a Correctly Installed Moen Shower Handle
A correctly installed Moen shower handle is crucial for several reasons. First and foremost, it guarantees a smooth and reliable operation of your shower’s water flow and temperature control. When the handle is properly aligned and secured, you can expect consistent performance without any frustrating glitches.
Secondly, a correct installation prevents unnecessary stress on other components of the shower valve, particularly the cartridge. This extends the lifespan of these parts and saves you money on potential repairs down the line.
Potential Problems of a Poor Installation
A poorly installed Moen shower handle can lead to a cascade of issues, ranging from minor annoyances to significant plumbing problems.
One of the most common consequences is leaks. If the handle isn’t properly seated or the set screw isn’t tightened correctly, water can seep out, leading to water damage and increased water bills.
Beyond leaks, a faulty installation can also damage the shower valve itself. Forcing the handle into place or over-tightening screws can strip threads or crack the valve body, resulting in costly repairs or even a complete valve replacement.
The frustration and inconvenience caused by a malfunctioning shower handle are also significant. Imagine stepping into the shower only to find that you can’t adjust the water temperature or that the water flow is erratic.
Your Guide to a Flawless Installation
This guide is designed to provide you with clear, step-by-step instructions on how to install your Moen shower handle correctly. We’ll walk you through each stage of the process, from removing the old handle to testing the new one, ensuring a smooth and hassle-free experience.
By following these instructions carefully, you can avoid common mistakes, prevent costly damage, and enjoy a properly functioning shower for years to come.
Understanding Your Moen Shower Handle and System
Before diving into the installation process, it’s essential to understand the specifics of your Moen shower system. Think of it as getting to know the patient before surgery. Familiarizing yourself with the components and identifying your exact model prevents compatibility issues and minimizes the risk of damage during installation.
Identifying Your Moen Model
Why is identifying your Moen model so important? Because Moen offers a wide range of shower systems, each with its own unique design and specifications. Attempting to install a handle designed for one model onto a different system can lead to improper fit, compromised functionality, or even damage to the valve.
Locating the model number can usually be done by checking the original product packaging, installation manuals, or by carefully examining the shower valve itself. Sometimes, the model number is stamped directly onto the valve body or cartridge. Online resources such as the Moen website or customer support can help if you are unable to find the model number on the physical product.
Knowing your model number ensures you purchase the correct replacement handle and any other necessary components. It also allows you to access specific installation instructions and diagrams, making the entire process smoother and more efficient.
Overview of the Shower Valve Components
The shower valve is the heart of your shower system, controlling water flow and temperature. Understanding its components is crucial for a successful handle installation. Here’s a breakdown of the key parts:
The Cartridge and its Role
The cartridge is the control center of the shower valve. This cylindrical component mixes hot and cold water to achieve your desired temperature. It then regulates the water flow to the showerhead.
Different Moen models utilize different cartridge designs. Some are pressure-balancing, which maintain a consistent temperature even when water pressure fluctuates elsewhere in the house. Others are thermostatic, offering more precise temperature control. Properly functioning cartridges are essential for a comfortable and safe shower experience.
The Retaining Clip
The retaining clip is a small but vital piece that secures the cartridge within the shower valve body. It prevents the cartridge from dislodging due to water pressure or handle movement.
Before removing or installing a cartridge, always locate and carefully remove the retaining clip. Neglecting this step can damage the valve body or cartridge. Note the orientation of the clip before removing it to ensure proper reinstallation.
The Set Screw
The set screw is a small screw, usually located on the side or underside of the shower handle. Its primary function is to secure the handle to the valve stem. When tightened, the set screw applies pressure, preventing the handle from slipping or rotating freely.
Using the correct size Allen wrench or hex key is critical when working with the set screw. Stripping the screw head makes removal and installation difficult. Applying too much force while tightening can also damage the valve stem.
Recognizing Potential Problems Before You Start
Before installing a new handle, take a moment to inspect the existing system for potential issues. Addressing these problems beforehand can save you time and prevent further complications.
Look for signs of corrosion around the valve body, cartridge, or handle stem. Corrosion can weaken components and make removal difficult. Mineral buildup can also impede the smooth operation of the valve.
Check the cartridge and retaining clip for any visible wear or damage. Cracks, brittleness, or deformation can indicate that these parts need replacement. Ignoring these issues can lead to leaks or valve failure.
By understanding your Moen shower system and identifying potential problems beforehand, you’ll be well-prepared for a successful and hassle-free handle installation.
Gathering the Right Tools and Materials
With a solid understanding of your Moen shower system under your belt, the next crucial step towards a successful handle installation is assembling the proper tools and materials. Approaching this stage with meticulous preparation can significantly streamline the process, minimizing frustration and potential setbacks.
Essential Tools for the Job
Having the right tools isn’t just about convenience; it’s about preventing damage and ensuring a professional-quality result. Here’s a rundown of the essential tools you’ll need:
-
Allen Wrench/Hex Key:
The Allen wrench (also known as a hex key) is indispensable for loosening and tightening the set screw that secures the handle to the valve stem.
It’s critically important to select the correct size Allen wrench for your particular set screw.
Using the wrong size can easily strip the screw head, rendering it impossible to remove or tighten and creating a much bigger headache.
Consider purchasing a set of Allen wrenches to guarantee you have the right size readily available.
-
Plumber’s Tape (Teflon Tape):
Plumber’s tape, also known as Teflon tape, is a thin, non-adhesive tape used to seal threaded pipe connections.
While it may not be directly involved in attaching the handle itself, it’s crucial for preventing leaks if you need to disassemble or adjust any plumbing connections during the process.
Keep a roll of plumber’s tape handy; it’s inexpensive and can save you from water damage down the road.
Gathering Necessary Materials
Beyond the tools, you’ll also need the right materials to complete the installation.
-
New Moen Shower Handle:
This might seem obvious, but it bears repeating: ensure you have the correct Moen shower handle model on hand before you begin.
Refer back to the model number you identified earlier and double-check that the new handle is a perfect match.
Nothing is more frustrating than starting a project only to realize you have the wrong replacement part.
Safety First: Turning off the Water Supply
Before you even think about picking up a wrench, the absolute first step is to shut off the water supply to your shower. This is not merely a suggestion; it’s a non-negotiable safety precaution.
Failing to turn off the water can result in a sudden, forceful spray of water that can damage your bathroom and lead to a significant waste of water.
To shut off the water, locate the shut-off valves for your shower.
These are often located in an accessible area behind an access panel, in the basement directly below the bathroom, or near the water meter.
Turn both the hot and cold water valves completely off.
After turning off the water, turn on the shower briefly to relieve any residual pressure in the pipes.
Gathering the necessary tools and materials sets the stage, but the real transformation happens during the installation itself. With your tools laid out and the water safely shut off, it’s time to dive into the heart of the matter: bringing your new Moen shower handle to life.
Step-by-Step Moen Shower Handle Installation
This section provides a detailed, step-by-step walkthrough of the installation process. Each step is broken down to ensure clarity, minimizing the risk of errors and maximizing your chances of a successful outcome.
Step 1: Removing the Old Handle
The first step is to bid farewell to the old handle. This process requires finesse to avoid damaging the underlying valve system.
Locating and Loosening the Set Screw
The set screw is a small but mighty component that secures the handle to the valve stem. It’s typically located on the underside or side of the handle. Use your Allen wrench to locate it.
Insert the correct size wrench and gently turn counterclockwise to loosen.
If the set screw is stuck, don’t force it. Apply a penetrating oil like WD-40 and let it sit for 15-20 minutes before trying again. Gentle tapping with a small hammer can also help break the corrosion.
Carefully Removing the Old Handle
Once the set screw is loose (or removed), gently wiggle the handle back and forth while pulling it away from the shower valve.
Avoid excessive force, as this could damage the valve stem. If the handle is stuck, try applying a bit more penetrating oil and wiggling it patiently.
Step 2: Preparing the Shower Valve
With the old handle removed, it’s time to prepare the shower valve for its new companion.
Cleaning the Valve Stem
Over time, mineral deposits and grime can accumulate on the valve stem. Use a clean cloth or brush to gently remove any debris. A clean stem ensures a smooth and secure fit for the new handle.
Inspecting the Cartridge and Retaining Clip
The cartridge is the heart of your Moen shower valve, controlling water flow and temperature. The retaining clip secures it in place.
Carefully inspect both components for signs of wear, corrosion, or damage.
If the cartridge is cracked, leaking, or difficult to turn, it should be replaced. Similarly, a damaged or broken retaining clip should also be replaced. These parts are readily available at most hardware stores.
Step 3: Installing the New Moen Shower Handle
Now for the exciting part: installing your new Moen shower handle.
Aligning the Handle Correctly
Before sliding the new handle onto the valve stem, take a moment to align it correctly.
Most Moen handles have a specific orientation to ensure proper function and aesthetics. Consult the handle’s installation instructions for guidance. Typically, the handle should point downwards when in the "off" position.
Securing with the Set Screw
Slide the handle onto the valve stem, ensuring it’s fully seated. Align the set screw hole with the flat part of the valve stem.
Insert the set screw and tighten it with the Allen wrench. Tighten it firmly, but be careful not to over-tighten, as this can strip the threads and damage the handle or valve stem. A good rule of thumb is to tighten until you feel resistance, then give it a quarter turn more.
Step 4: Testing and Troubleshooting
With the new handle installed, it’s time to put it to the test.
Turning the Water Supply Back On
Slowly and carefully turn the water supply back on. Keep an eye out for any leaks around the valve stem or handle.
Checking for Leaks
If you spot any leaks, immediately turn off the water supply and double-check the set screw tightness and handle seating. Plumber’s tape may be needed on the valve stem threads if there’s still leaking around the handle after tightening the set screw.
Adjusting the Handle for Smooth Operation
Once you’ve confirmed there are no leaks, test the handle’s operation. It should turn smoothly and easily, controlling the water flow and temperature as expected. If the handle feels stiff or difficult to turn, loosen the set screw slightly and try readjusting the handle position.
Common Mistakes to Avoid During Installation
Gathering the right tools and materials sets the stage, but the real transformation happens during the installation itself. With your tools laid out and the water safely shut off, it’s time to dive into the heart of the matter: bringing your new Moen shower handle to life. It’s equally crucial to understand the potential pitfalls that can derail your project. Understanding these common errors and how to avoid them will not only save you time and frustration but could also prevent costly repairs down the line.
The Perils of Overtightening
One of the most frequent mistakes is overtightening the set screw. This seemingly small component plays a crucial role in securing the handle, but applying excessive force can lead to disaster. The threads in the handle or, worse, the valve stem, can become stripped.
Stripped threads render the set screw useless, preventing it from properly securing the handle. This results in a loose or wobbly handle, and the need for replacement parts or even professional intervention.
How to Avoid Overtightening:
- Use the correct size Allen wrench for the set screw. A loose fit increases the risk of stripping the screw head.
- Tighten the set screw gradually, checking the handle’s stability as you go. Stop tightening as soon as the handle feels secure and doesn’t wiggle.
- Resist the urge to apply maximum force. A snug fit is all that’s required.
The Forgotten Seal: Why Plumber’s Tape Matters
Another common oversight is forgetting to use plumber’s tape (also known as Teflon tape) on any threaded connections, if applicable to your specific Moen model or valve stem. Plumber’s tape creates a watertight seal, preventing leaks that can cause water damage and waste.
Why Plumber’s Tape is Essential:
- It fills tiny imperfections in the threads, creating a tight seal.
- It prevents corrosion and makes future disassembly easier.
How to Apply Plumber’s Tape Correctly:
- Wrap the tape clockwise around the threads, overlapping each layer slightly.
- Apply enough tape to create a noticeable thickness, but not so much that it interferes with the connection.
- Ensure the tape is clean and free of debris before making the connection.
Ignoring the Manual: A Recipe for Disaster
Perhaps the most critical mistake is ignoring the installation instructions that come with your specific Moen shower handle model. Each model may have unique requirements or steps.
Treating all installations as the same can lead to errors and potential damage.
Why the Installation Instructions are Your Best Friend:
- They provide model-specific guidance, ensuring compatibility and proper installation.
- They often include diagrams and troubleshooting tips.
- Following the instructions can help you avoid voiding the warranty.
Before you even pick up a tool, thoroughly read and understand the instructions. Keep them handy throughout the installation process for reference.
Handle with Care: Protecting the Shower Valve
The shower valve is the heart of your shower system, and careless handling can cause significant damage. Applying excessive force, using the wrong tools, or dropping components can all lead to valve damage.
How to Protect the Shower Valve:
- Avoid using excessive force when removing or installing components.
- Use the correct tools for each task.
- Support the valve while working to prevent it from shifting or breaking.
If you encounter resistance or feel unsure about any step, stop and consult the instructions or seek professional help. A damaged shower valve can be costly to repair.
Dealing with Difficult Situations and Troubleshooting
Even with meticulous preparation, Moen shower handle installations can sometimes present unforeseen challenges. A set screw stubbornly refusing to budge, or a cartridge showing signs of wear, can quickly turn a straightforward DIY project into a frustrating ordeal. Knowing how to navigate these potential roadblocks is key to a successful outcome. However, it’s also crucial to recognize when the problem exceeds your skill level and professional assistance is warranted.
Frozen Set Screw: The Unmovable Obstacle
A frozen set screw is a common installation hurdle. Corrosion, mineral buildup, or simply being overtightened in the past can cause the screw to seize within the handle. Applying excessive force can strip the screw head, further complicating the issue.
Gentle Persuasion Techniques
Before resorting to drastic measures, try these methods to loosen a frozen set screw:
- Penetrating Oil: Apply a small amount of penetrating oil, like WD-40 or Liquid Wrench, directly to the set screw. Allow it to sit for at least 15-30 minutes to penetrate the corrosion.
- Heat Application: Gently heating the area around the set screw can help expand the metal and break the bond. A hairdryer or heat gun (used carefully on a low setting) can be effective. Avoid prolonged or excessive heat, which could damage surrounding parts.
- Tapping: Lightly tap the Allen wrench with a hammer while it’s inserted into the set screw. The vibrations can help loosen the corrosion.
- Correct Allen Wrench: Ensure you’re using the correct size Allen wrench. An ill-fitting wrench will round out the screw head more easily. Try a new, high-quality wrench for a snug fit.
When All Else Fails
If the above methods prove unsuccessful, consider a screw extractor. This tool is designed to grip and remove damaged or stripped screws. Carefully follow the extractor’s instructions to avoid further damage. As a last resort, you may have to carefully drill out the set screw. Exercise extreme caution to avoid damaging the valve stem.
Identifying Cartridge Issues: Is Replacement Necessary?
The shower valve cartridge is the heart of your Moen system, controlling water flow and temperature. Over time, cartridges can wear out due to mineral buildup, corrosion, or general use.
Recognizing the signs of a failing cartridge is crucial before installing a new handle.
Symptoms of a Failing Cartridge
- Dripping Faucet: A persistent drip, even when the handle is in the "off" position, is a telltale sign.
- Difficulty Adjusting Temperature: Inconsistent water temperature or difficulty achieving the desired temperature are strong indicators.
- Reduced Water Flow: A noticeable decrease in water pressure, even with the showerhead functioning properly, could point to a cartridge problem.
- Stiff or Difficult Handle Operation: If the handle is hard to turn or feels stiff, the cartridge may be binding.
Cartridge Inspection
Before replacing the cartridge, visually inspect it for:
- Cracks or Damage: Look for any visible cracks or breaks in the cartridge body.
- Mineral Buildup: Check for mineral deposits around the cartridge openings or moving parts.
- O-Ring Condition: Inspect the O-rings for signs of wear, cracking, or deterioration.
If the cartridge exhibits any of these issues, replacement is recommended. Always refer to your Moen model number when purchasing a replacement cartridge to ensure compatibility.
When to Call a Professional Plumber: Recognizing Your Limits
While many Moen shower handle installations are within the capabilities of a handy homeowner, certain situations demand the expertise of a licensed plumber. Knowing when to call for help can prevent costly mistakes and potential damage to your plumbing system.
Situations Requiring Professional Assistance
- Extensive Corrosion: Severe corrosion on the shower valve or surrounding pipes can make disassembly difficult and increase the risk of leaks.
- Broken or Damaged Valve: If the shower valve itself is cracked, broken, or significantly damaged, professional repair or replacement is necessary.
- Inability to Shut Off Water: If you cannot locate or properly shut off the water supply to the shower, do not proceed with the installation.
- Lack of Experience: If you are uncomfortable with any aspect of the installation process or lack basic plumbing knowledge, it is best to seek professional assistance.
Attempting repairs beyond your skill level can lead to further damage, water leaks, and potentially costly repairs. A licensed plumber has the experience, tools, and knowledge to diagnose and resolve complex plumbing issues safely and effectively. Don’t hesitate to call a professional when needed – it can save you time, money, and unnecessary headaches in the long run.
Dealing with difficult installations and unexpected problems can be frustrating. Successfully navigating those challenges, however, provides a real sense of accomplishment. But the work doesn’t end once the new Moen shower handle is in place. To ensure years of reliable performance and maintain its aesthetic appeal, adopting a consistent maintenance routine is crucial.
Maintaining Your Moen Shower Handle for Longevity
A little regular attention goes a long way in preserving the life and luster of your Moen shower handle. Proper maintenance not only keeps it looking its best but also helps prevent potential problems down the road. This section details the recommended cleaning methods and preventative measures to ensure your Moen shower handle stands the test of time.
Regular Cleaning: Keeping Your Handle Sparkling
Regular cleaning is essential for preventing mineral buildup and maintaining the finish of your Moen shower handle. The frequency of cleaning depends on water hardness and usage, but a weekly or bi-weekly wipe-down is generally sufficient.
Recommended Cleaning Methods
- Gentle Cleaning Solutions: Avoid abrasive cleaners, which can scratch and damage the finish. Instead, opt for mild soap and water or specialized bathroom cleaners designed for chrome or brushed nickel finishes.
- Soft Cloths: Use a soft, non-abrasive cloth or sponge to wipe down the handle. Microfiber cloths are particularly effective for removing dirt and grime without scratching.
- Vinegar Solution for Hard Water Stains: For stubborn hard water stains or mineral deposits, a solution of equal parts white vinegar and water can be effective. Apply the solution to the affected area, let it sit for a few minutes, and then gently scrub with a soft cloth. Rinse thoroughly with water.
- Rinsing and Drying: After cleaning, always rinse the handle thoroughly with clean water to remove any soap or cleaning solution residue. Dry the handle with a clean, dry cloth to prevent water spots.
Preventative Measures to Extend its Lifespan
Beyond regular cleaning, several preventative measures can help extend the lifespan of your Moen shower handle and prevent potential problems.
Preventing Water Damage and Corrosion
- Proper Ventilation: Ensure adequate ventilation in your bathroom to reduce humidity levels. High humidity can accelerate corrosion and damage to the handle’s finish.
- Addressing Leaks Promptly: Address any leaks around the shower valve or handle immediately. Even small leaks can cause water damage and corrosion over time.
- Avoiding Chemical Exposure: Be mindful of the cleaning products used in the shower area. Harsh chemicals, such as bleach or ammonia, can damage the handle’s finish.
Protecting the Finish
- Gentle Handling: Avoid using excessive force when operating the handle. Rough handling can cause wear and tear on the internal components and damage the finish.
- Regular Inspection: Periodically inspect the handle for any signs of wear, corrosion, or damage. Addressing small problems early can prevent them from escalating into more significant issues.
- Consider Water Softener Installation: If you live in an area with hard water, consider installing a water softener. This can significantly reduce mineral buildup and extend the lifespan of all your plumbing fixtures, including your Moen shower handle.
By following these simple maintenance tips and preventative measures, you can ensure that your Moen shower handle remains in excellent condition for years to come, providing reliable performance and enhancing the overall look of your bathroom.
Moen Shower Handle Install: FAQs
Here are some frequently asked questions to help you avoid costly mistakes when installing your Moen shower handle.
What tools are absolutely essential for a Moen shower handle installation?
At a minimum, you’ll need a Phillips head screwdriver, possibly a flathead screwdriver, pliers or channel locks, and potentially a Moen handle puller if the old handle is stuck. Knowing how to install a Moen shower handle also means having the right tools ready.
How do I identify the correct Moen shower handle replacement for my faucet?
Check for model numbers stamped on the faucet escutcheon plate (the plate behind the handle) or the valve body. You can also use the Moen website or contact their customer service with photos of your existing handle for identification. Identifying the correct replacement makes the how to install moen shower handle steps much easier.
What’s the most common mistake people make when installing a new Moen shower handle?
Over-tightening screws is a major issue. It can strip the screw heads or even damage the faucet valve cartridge, leading to leaks and further repairs. Remember, when you learn how to install a Moen shower handle, torque control is crucial.
What if my Moen shower handle is stuck and I can’t remove it?
Try using a Moen handle puller. This tool is designed to grip the handle securely and provide leverage to remove it without causing damage. Penetrating oil can also help loosen corrosion. If it’s still stuck, consider calling a plumber to avoid damaging the valve stem. Learning how to install Moen shower handle parts also means knowing how to remove the old ones without causing damage.
Alright, you’re armed with the knowledge to tackle that how to install Moen shower handle project like a pro! Take your time, double-check those connections, and you’ll be enjoying that new handle in no time. Good luck and happy showering!