A breezy home requires more than just open windows. Proper window screens, obtainable from suppliers like Home Depot, become necessary to keep pesky bugs at bay. Maintaining these screens, often using tools such as a specialized screen rolling tool, is an achievable task. Learning how to install window screen, whether you’re tackling a DIY project or seeking advice from Bob Vila-endorsed methods, can dramatically improve your home’s comfort and value. A new screen provides enhanced airflow and protects against unwanted guests.
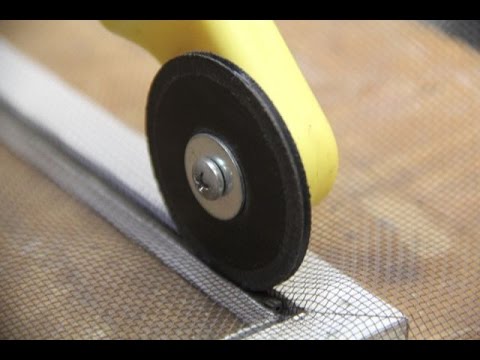
Image taken from the YouTube channel Concord Carpenter , from the video titled Replacing a Window Screen 5-Steps .
Welcome, fellow DIY enthusiasts, to the rewarding world of window screen installation!
Are you tired of uninvited guests buzzing around your home? Do you dream of open windows without the fear of insects invading your personal space?
This guide will equip you with the knowledge and confidence to tackle window screen installation like a pro.
A properly installed window screen is more than just a barrier against pesky insects. It’s an investment in your home’s comfort, your family’s well-being, and even your energy bill.
Let’s explore why this seemingly simple project can make a significant difference.
The Unsung Hero: Why Window Screens Matter
Window screens often go unnoticed, silently performing their duties day in and day out. But their impact on your home environment is undeniable.
-
Comfort: Imagine enjoying a cool breeze on a warm summer evening without the constant swatting and buzzing. Window screens allow you to open your windows and let fresh air circulate freely.
-
Energy Savings: By relying on natural ventilation, you can reduce your dependence on air conditioning. This translates to lower energy bills and a smaller carbon footprint.
-
Pest Control: The most obvious benefit, of course, is keeping unwanted insects out. Mosquitoes, flies, and other pests can carry diseases and disrupt your peace of mind. A well-maintained screen provides a reliable defense against these intruders.
Your 5-Step Path to a Bug-Free Home
This guide will walk you through the entire installation process in five easy-to-follow steps.
Each step is designed to be straightforward, even for beginners.
We’ll cover everything from gathering your supplies to making those final touches.
Get ready to transform your windows into insect-proof portals to fresh air and natural light!
The unsung heroes of a successful window screen installation extend beyond skill and determination. Before you even think about picking up a screen, prioritize preparation.
Gather Your Supplies: Screen Installation Tool Checklist
Think of a meticulously organized kitchen before a complex recipe. Having every ingredient measured and every utensil within reach transforms the cooking experience from stressful to satisfying.
Similarly, a well-stocked toolkit will make your window screen installation smoother, faster, and significantly more enjoyable. Don’t underestimate the power of preparation!
The Essential Toolkit: What You’ll Need
Here’s a detailed checklist of the tools and materials you’ll need to conquer this project. Consider this your pre-flight checklist for a successful mission.
-
New Window Screen (Screening Material): This is the foundation of your project. Choose a material that suits your needs. Fiberglass is a popular, cost-effective option, while aluminum offers greater durability. Consider pet-resistant screens if you have furry friends who might test its integrity.
-
Spline: This flexible cord locks the screen into the frame. Be sure to select the correct diameter spline for your window frame’s groove. A spline that’s too thin won’t hold the screen securely, while one that’s too thick will be impossible to install. When purchasing your spline, always check the sizes that are required for a proper fit.
-
Spline Roller: This specialized tool is designed to press the spline into the frame’s groove without damaging the screen. A quality spline roller will have a smooth, rotating wheel that makes the process effortless.
-
Utility Knife: A sharp utility knife is essential for trimming excess screening material. Be sure to use a new blade for clean, precise cuts. Safety first, of course!
-
Measuring Tape: Accuracy is key to a professional-looking result. A reliable measuring tape will ensure you cut the screen to the precise dimensions of your window frame.
Why the Right Tools Matter: A Recipe for Success
Imagine trying to assemble furniture without the correct screwdriver. Frustration mounts quickly, and the final product is often wobbly and unstable.
The same principle applies to window screen installation. Having the right tools not only simplifies the task, but also ensures a professional-looking and long-lasting result.
A dedicated spline roller, for instance, provides the leverage and control needed to achieve a tight, even fit. A sharp utility knife ensures clean cuts, preventing fraying and a sloppy appearance.
Investing in the right tools is an investment in the success of your project. It translates to a more enjoyable experience and a final product you can be proud of. It’s a small price to pay for peace of mind and a bug-free home.
New screens and a well-stocked toolkit set the stage, but the real artistry begins with precision. Accurate measurements are the bedrock of a snug, bug-proof window screen. A miscalculation here can lead to a frustratingly loose fit or wasted materials. Let’s ensure that doesn’t happen to you.
Precise Measurements: Cutting Your Screening Material to Size
The difference between a professional-looking installation and a sloppy one often boils down to accurate measurements. It’s tempting to eyeball it, but resist that urge! Taking the time to measure carefully and cut precisely will save you headaches later.
Measuring the Window Frame: The Foundation of Success
Before unfurling your new screen, you’ll need to take precise measurements of your window frame opening. Follow these steps for optimal accuracy:
-
Clear the Area: Ensure the window frame is clean and free from obstructions.
-
Measure the Width: Use your measuring tape to measure the width of the screen opening inside the window frame, from edge to edge. Take this measurement at the top, middle, and bottom of the opening. If the measurements differ, use the largest one.
-
Measure the Height: Similarly, measure the height of the opening on both sides and in the center. Again, record the largest measurement.
-
Record Your Measurements: Write down these measurements. Don’t trust your memory! Label them clearly as width and height.
Cutting the Screen: Precision is Paramount
With your measurements in hand, it’s time to cut the screen material. Remember, it’s always better to have a little extra material than not enough.
-
Prepare Your Work Surface: Lay the screen material on a clean, flat surface. A large table or even the floor covered with cardboard works well.
-
Transfer Measurements: Using your measuring tape and a marker or pen, carefully transfer the width and height measurements onto the screen material.
- Crucially, add at least 2 inches to both the width and the height. This extra material provides sufficient overlap to grip the frame during installation. It also will ensure a more even tension.
-
Make the Cut: Using a sharp utility knife, carefully cut along the marked lines. A metal ruler or straight edge will help ensure a straight, clean cut.
- Use a fresh blade in your utility knife. A dull blade can snag the screen material and create a ragged edge.
Avoiding Common Measurement and Cutting Errors
Even with careful measuring, it’s easy to make mistakes. Here are some common pitfalls to avoid:
-
Rounding Down: Always round up to the nearest fraction of an inch. An extra eighth of an inch is better than being short.
-
Assuming Squareness: Don’t assume your window frame is perfectly square. Measure at multiple points to account for any irregularities.
-
Using Dull Blades: A dull utility knife blade will tear the screen instead of cutting it cleanly, leading to a frayed edge that’s difficult to work with.
-
Skipping the Overlap: Forgetting to add the extra 2 inches for overlap is a common mistake. This overlap is crucial for a secure and even fit.
By following these guidelines and paying close attention to detail, you can ensure your screen is cut to the perfect size, setting you up for a successful and satisfying installation. Now, it’s time to start securing that screen.
New screens and a well-stocked toolkit set the stage, but the real artistry begins with precision. Accurate measurements are the bedrock of a snug, bug-proof window screen. A miscalculation here can lead to a frustratingly loose fit or wasted materials. Let’s ensure that doesn’t happen to you.
Once you’ve carefully measured and cut your screen, the next step is where everything comes together. It’s time to move from preparation to installation. Now, we’ll focus on securing the screen within the frame, creating that essential barrier against unwanted guests.
Securing the Screen: Rolling the Spline for a Tight Fit
The spline is the unsung hero of your window screen, the flexible cord that locks the screening material into the frame. Securing the screen properly involves understanding how the spline roller works and mastering the technique of rolling the spline into the frame. This step is critical. A tight, even fit is essential to prevent sagging, gaps, and ultimately, unwelcome bugs.
Understanding the Spline Roller
The spline roller, a seemingly simple tool, is key to achieving a professional-looking result. It typically features two wheels:
- A concave wheel, designed to press the spline into the frame’s groove.
- A convex wheel, used to seat the screen into the groove before the spline.
The Step-by-Step Spline Rolling Process
Follow these steps carefully to ensure a secure and even fit:
-
Position the Screen: Lay the screen material over the window frame, ensuring it overlaps the edges evenly on all sides.
-
Initial Seating: Using the convex wheel of the spline roller, gently push the screen material into the groove along one side of the frame. This creates a starting point.
-
Inserting the Spline: Hold the spline along the groove, on top of the screen material that you have seated.
-
Rolling the Spline: Now, switch to the concave wheel. Apply firm, even pressure as you roll the spline into the groove. Work along the entire length of one side.
-
Repeat for All Sides: Repeat steps 2-4 for the remaining three sides of the window frame.
-
Maintain Tension: As you roll, maintain consistent tension on the screen material. This will prevent wrinkles and sagging.
Achieving a Tight and Even Fit: Tips and Tricks
-
Even Pressure: Apply consistent pressure on the spline roller. Avoid pressing too hard in some areas and too lightly in others.
-
Smooth Strokes: Use smooth, continuous strokes. Avoid jerky movements, which can create uneven pressure and a wavy screen surface.
-
Correct Spline Size: Ensure you’re using the correct spline size for your frame. Too small, and it won’t hold the screen securely. Too large, and it will be difficult to roll in.
-
Cornering Technique: When you reach a corner, gently curve the spline around the corner. Avoid sharp bends or kinks.
Troubleshooting Common Issues
-
Screen Sagging: If the screen sags, it indicates insufficient tension. Remove the spline, re-stretch the screen, and re-roll the spline.
-
Spline Pops Out: If the spline keeps popping out, it could be the wrong size. Try a thicker spline or ensure the groove is clean and free of debris.
-
Uneven Surface: An uneven surface indicates uneven pressure. Remove the spline and try again, focusing on maintaining consistent pressure.
By mastering the art of spline rolling, you’ll create a window screen that not only looks professional but also provides reliable protection against insects.
Finishing Touches: Trimming Excess Material for a Clean Look
With the spline firmly in place, securing the screen within the frame, it’s time to refine our work. This is where we transform a functional repair into a polished, professional-looking installation. Trimming the excess screening material is about more than just aesthetics; it’s about preventing snags, ensuring longevity, and taking pride in a job well done.
Achieving a Professional Edge: The Art of Trimming
The goal here is simple: remove the excess screen material extending beyond the frame while avoiding any damage to the newly secured screen. Patience and a steady hand are your best allies.
The Right Tool for the Job: Utility Knife Selection
A sharp utility knife is indispensable. Ensure the blade is new and extremely sharp. A dull blade requires more pressure, increasing the risk of slipping and causing injury or tearing the screen. Retractable utility knives with replaceable blades are ideal for this task.
Step-by-Step Trimming Guide
-
Prepare Your Work Surface: Place the screen on a stable, flat surface. This will provide a solid base for controlled cutting.
-
Establish a Cutting Line: Use the edge of the screen frame as your guide. The goal is to cut as close as possible to the spline without actually cutting into it.
-
The First Cut: Hold the utility knife at a shallow angle, approximately 30-45 degrees, to the frame. Begin your cut at one corner and, using a smooth, continuous motion, follow the frame’s edge.
-
Multiple Passes: Avoid trying to cut through the screen in one go. Instead, use multiple light passes. This reduces the risk of tearing and provides a cleaner cut.
-
Corners Require Extra Care: At the corners, slow down and ensure the blade follows the exact contour of the frame. A slight curve here can ruin the clean lines of your finished screen.
-
Dispose of Scraps Immediately: Screen scraps are sharp and can easily cause cuts. Safely dispose of them as you work.
Prioritizing Safety: Avoiding Utility Knife Injuries
Working with a utility knife demands respect for safety. A moment’s inattention can lead to a nasty cut.
- Always cut away from yourself. This is a cardinal rule of utility knife safety.
- Use a cutting mat or board. This protects your work surface and helps prevent the blade from slipping.
- Keep your fingers out of the cutting path. This may seem obvious, but it’s crucial to maintain constant awareness of your hand placement.
- Wear cut-resistant gloves. These gloves provide an extra layer of protection against accidental cuts.
- Never leave a utility knife unattended with the blade exposed. This is especially important if you have children or pets.
Inspecting Your Work: Ensuring a Clean Finish
Once you’ve trimmed all four sides, carefully inspect your work. Look for any frayed edges or uneven cuts. A second, lighter pass with the utility knife can correct minor imperfections. The goal is a seamless transition between the screen and the frame, a sign of careful craftsmanship.
By mastering the art of trimming, you elevate your DIY window screen installation from merely functional to genuinely impressive. This final step is a testament to your attention to detail and your commitment to a job well done.
Finishing the trimming process, you’re likely eager to admire your handiwork. But before you relax completely, a meticulous final inspection is crucial. This ensures not only a visually appealing result but also a functionally sound barrier against unwanted pests.
Final Inspection: Ensuring a Bug-Proof Seal and Celebrating Success
Think of this stage as your quality control checkpoint. It’s where you identify and rectify any minor flaws that might compromise the screen’s integrity. Remember, even a tiny gap is an open invitation for insects! It’s about achieving perfection and truly enjoying the fruits of your labor.
The Importance of a Thorough Check
Don’t underestimate the value of a careful inspection. It’s easy to overlook small details, but these details can make all the difference. A quick once-over simply won’t cut it. Instead, invest the time to scrutinize every inch of the screen.
This is your last line of defense against unwelcome guests.
Inspecting for Imperfections
Here’s what to look for during your inspection:
- Loose Spots: Carefully run your fingers along the edge of the screen. Check for any areas where the screen feels loose or detached from the spline.
- Spline Integrity: Ensure the spline is uniformly seated within the frame’s groove. Look for any sections where it appears to be bulging out or is not fully engaged.
- Tears or Holes: Even the smallest tears or holes can provide entry points for insects. Pay close attention to the corners and edges, as these are often vulnerable areas.
- Frame Gaps: Check the frame itself for any gaps or cracks that might allow insects to bypass the screen entirely.
Addressing Loose Spots and Imperfections
Finding imperfections is not a failure! It’s simply an opportunity to refine your work. Here’s how to address common issues:
- Loose Spots: If you find a loose spot, use your spline roller to re-roll the spline in that area. Apply firm, even pressure to ensure a tight fit.
- Spline Issues: If the spline is damaged or improperly seated, carefully remove it and replace it with a new piece. Re-roll the new spline into the groove.
- Small Tears/Holes: For very small tears, a tiny dab of clear adhesive can sometimes suffice. However, for larger tears, it’s best to replace the affected section of the screen.
- Frame Gaps: Seal any frame gaps with caulk or weather stripping to create a complete barrier.
It’s often better to take an extra five minutes to address an issue, rather than deal with an infestation later.
Celebrating Your Success
Once you’ve completed your final inspection and addressed any imperfections, take a moment to appreciate your accomplishment. You’ve successfully installed a window screen, enhancing your home’s comfort and protecting it from pests.
This is a testament to your DIY skills and a reason to be proud.
Consider sharing your accomplishment with friends and family. You might even inspire them to tackle their own home improvement projects!
Now, open that window, enjoy the fresh air, and relish the peace of mind that comes with a bug-free home. You deserve it!
Screen Repair 101: Quick Fixes for Minor Damage
Finishing the trimming process, you’re likely eager to admire your handiwork. But before you relax completely, a meticulous final inspection is crucial. This ensures not only a visually appealing result but also a functionally sound barrier against unwanted pests.
Think of this final stage as protecting your investment.
But what happens when, despite your best efforts, a rogue pebble or a curious pet introduces a tear into your otherwise perfect screen?
Don’t despair!
Minor damage doesn’t always necessitate a complete screen replacement.
Let’s explore some quick and effective repair strategies.
Patching Small Tears: The Art of the Invisible Mend
Small tears, less than an inch in diameter, are often easily repairable.
The key is to act quickly before the damage spreads.
A simple patch can restore your screen’s integrity and prevent further unraveling.
Simple Repair Options
There are a few options when it comes to patching small holes:
- Needle and Thread: A classic solution! Use a strong, UV-resistant thread that closely matches the color of your screen.
Carefully stitch the tear closed, overlapping the edges slightly.
Knot securely. - Screen Repair Tape: Available at most hardware stores, this specialized tape adheres directly to the screen, providing a durable and nearly invisible patch.
Cut a piece slightly larger than the tear, round the edges to prevent peeling, and apply firmly. - Clear Nail Polish or Glue: For very small holes, a dab of clear nail polish or specialized fabric glue can seal the edges and prevent further fraying.
When to Replace, Not Repair: Assessing the Damage
While patching is a great option for minor issues, sometimes the damage is simply too extensive.
Knowing when to throw in the towel and opt for a full replacement is crucial.
Attempting to repair a severely damaged screen can be a waste of time and effort, often leading to a less-than-satisfactory result.
Signs You Need a New Screen:
- Large Tears or Holes: If the tear is larger than a few inches, or if there are multiple tears in close proximity, replacement is generally the best option.
- Frame Damage: A bent, warped, or cracked frame will compromise the screen’s integrity, regardless of the condition of the mesh.
In this case, replacement is necessary. - Widespread Deterioration: If the screen material is brittle, faded, or showing signs of widespread wear and tear, it’s time for a new screen.
This indicates that the material is nearing the end of its lifespan. - Loose or Missing Spline Groove: When the groove around the frame is damaged and is incapable of holding a spline, it’s time for a new frame.
Prevention is Key: Extending the Life of Your Screens
While repairs are sometimes unavoidable, preventative measures can significantly extend the lifespan of your window screens.
- Gentle Cleaning: Regularly clean your screens with a soft brush and mild soapy water to remove dust, dirt, and debris.
Avoid using harsh chemicals or abrasive cleaners, which can damage the screen material. - Proper Storage: During the off-season, store your screens in a dry, protected area to prevent damage from the elements.
- Pet Protection: If you have pets, consider using pet-resistant screen material, which is designed to withstand scratching and clawing.
- Regular Inspection: Periodically inspect your screens for any signs of damage and address them promptly to prevent minor issues from escalating.
By following these simple repair tips and taking preventative measures, you can keep your window screens in top condition and enjoy a bug-free home for years to come!
Don’t be afraid to tackle those minor repairs – you’ve got this!
Window Screen Installation: Your Questions Answered
Here are some frequently asked questions about installing a window screen, as covered in our guide.
What tools do I really need to install a window screen?
Generally, you’ll need a spline roller tool, a utility knife, a screen frame, screen mesh, and spline. Depending on your specific window, you might also need pliers or a screwdriver. Knowing how to install a window screen involves having the right tools on hand.
Can I reuse my old window screen frame?
Yes, if the frame is still in good condition – not bent or damaged. Remove the old screen and spline carefully. This can save money and reduce waste when you learn how to install window screen replacements.
What type of screen mesh is best?
Fiberglass is a common, affordable option. Aluminum is more durable but can be harder to work with. Consider your needs and budget when selecting the mesh for your how to install window screen project.
How do I ensure the screen mesh is tight and doesn’t sag?
Stretch the mesh evenly across the frame before using the spline roller. Applying even pressure is critical to how to install window screen replacements properly. This will help prevent sagging and ensure a snug fit.
So, that’s it! You now have the know-how on how to install window screen. Go forth and conquer those pesky screens. You’ve got this!