The toilet flush system, a marvel of simple engineering, relies heavily on the correct operation of the floating ball in toilet tank. When problems arise, understanding the interaction between the float arm and the fill valve becomes crucial for effective repairs. In many households, the Fluidmaster company provides replacement parts and solutions, ensuring homeowners can tackle these plumbing issues. Diagnosing issues with the floating ball in toilet tank allows you to troubleshoot common problems and potentially avoid costly plumbing service calls.
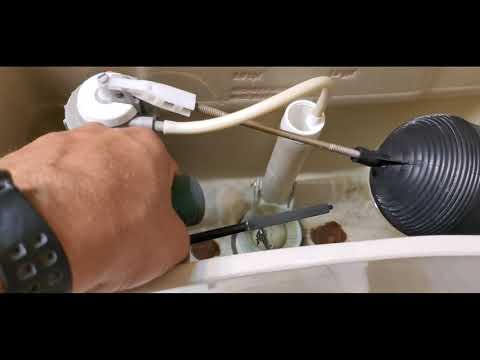
Image taken from the YouTube channel Green Residential , from the video titled How to Adjust the Ballcock Valve and Water Level in a Toilet Tank .
Understanding and Fixing Issues with the Floating Ball in Your Toilet Tank
The floating ball in your toilet tank (also known as a float ball or float valve) is a crucial component that regulates the water level. When it malfunctions, it can lead to various problems, including a constantly running toilet, weak flushing, or a toilet that won’t stop filling. This guide will help you understand how the floating ball works and how to troubleshoot common issues.
How the Floating Ball System Works
The floating ball is connected to a fill valve, which controls the flow of water into the tank. As the water level rises, so does the ball. When the ball reaches a predetermined height, it shuts off the fill valve, stopping the water flow. When you flush the toilet, the water level drops, the ball descends, and the fill valve opens, refilling the tank.
Common Problems with the Floating Ball
Several issues can arise with the floating ball system. Here are some of the most common:
- Toilet Runs Constantly: This often indicates the fill valve isn’t shutting off properly.
- Weak Flush: If the water level isn’t reaching the correct height, the flush will be weak.
- Toilet Won’t Stop Filling: Similar to a constantly running toilet, this suggests the valve isn’t closing completely.
- Float Ball is Submerged or Leaking: A damaged or waterlogged float ball won’t float correctly.
- Arm is Bent or Misaligned: If the arm connecting the float ball to the fill valve is bent, it may not activate the valve correctly.
Troubleshooting and Repairing the Floating Ball
Here’s a step-by-step guide to diagnosing and fixing problems with the floating ball:
1. Checking the Float Ball Position and Adjustment
- Visually Inspect: Open the toilet tank and observe the float ball’s position relative to the water level. The water level should typically be about 1 inch below the top of the overflow tube.
- Adjustment Methods:
- Screw Adjustment: Some fill valves have a screw that allows you to adjust the height of the float. Turning the screw clockwise raises the water level, while turning it counter-clockwise lowers it.
- Arm Adjustment: If there’s no screw, you may need to bend the float arm slightly. Be gentle! Bending it too much can damage it. To raise the water level, bend the arm upward. To lower it, bend it downward.
- Testing: After making adjustments, flush the toilet and observe if the water level stops at the correct height.
2. Inspecting the Float Ball for Damage
- Visual Inspection: Check the float ball for cracks or holes.
- Waterlogged Test: Remove the float ball (usually by unscrewing it from the arm). Shake it to see if there’s water inside. A waterlogged ball needs to be replaced.
- Replacement: If the float ball is damaged or waterlogged, replace it with a new one. These are readily available at hardware stores.
3. Examining the Float Arm
- Check for Obstructions: Make sure the float arm isn’t hitting anything inside the tank, preventing it from moving freely.
- Check for Corrosion: Inspect the arm for rust or corrosion. If heavily corroded, the arm should be replaced along with the ball and possibly the fill valve.
- Arm Alignment: The arm should move smoothly and freely. If it’s bent or misaligned, gently try to straighten it. If it’s too damaged, replace it.
4. Cleaning the Fill Valve
Sometimes, debris can clog the fill valve, preventing it from closing properly.
- Turn off the water supply to the toilet (usually a valve located behind the toilet).
- Flush the toilet to empty the tank.
- Carefully remove the fill valve cap (refer to the valve’s instructions for specific removal procedures).
- Inspect for debris and clean the valve with a small brush or cloth.
- Reassemble the valve and turn the water supply back on.
5. Troubleshooting Based on Specific Symptoms
| Symptom | Possible Cause | Solution |
|---|---|---|
| Toilet Runs Constantly | Float ball not rising high enough | Adjust the float ball position upward. |
| Toilet Runs Constantly | Damaged or waterlogged float ball | Replace the float ball. |
| Toilet Runs Constantly | Fill valve clogged or malfunctioning | Clean or replace the fill valve. |
| Weak Flush | Float ball set too low | Adjust the float ball position upward. |
| Toilet Won’t Stop Filling | Float ball set too high | Adjust the float ball position downward. |
| Toilet Won’t Stop Filling | Fill valve malfunctioning | Clean or replace the fill valve. |
If you’ve tried these steps and are still having problems, it might be time to consider replacing the entire fill valve assembly. These are relatively inexpensive and easy to install, and a new fill valve will ensure optimal performance.
Floating Ball Toilet Repair FAQs
Here are some frequently asked questions to help you further understand how to fix your toilet using the secrets of the floating ball.
Why is my toilet running constantly, even after flushing?
A constantly running toilet is often caused by a faulty or improperly adjusted floating ball in the toilet tank. The floating ball regulates the water level; if it’s set too high or damaged, water will continuously flow into the overflow tube.
How do I adjust the floating ball in my toilet tank?
Most floating ball assemblies have a screw or clip that allows you to adjust the arm’s height. By lowering the floating ball, you reduce the water level, preventing overflow. Experiment with small adjustments until the water stops running after the tank refills.
What if the floating ball itself is damaged?
If the floating ball has a crack or hole, it will fill with water and sink, failing to shut off the water supply. In this case, replacing the floating ball is necessary. These are inexpensive and readily available at hardware stores.
Can I replace the entire floating ball assembly with a different type of fill valve?
Yes, you can replace the traditional floating ball mechanism with a modern fill valve. These are often more reliable and easier to adjust, offering a more efficient way to control the water level in your toilet tank.
So, next time your toilet is acting up, don’t panic! Check that floating ball in toilet tank first – you might just save yourself a headache (and some water!). Happy flushing!