Considering a sewage pump install? Many homeowners explore this option to manage wastewater effectively. Zoeller Pumps, a well-known manufacturer, offers various models designed for different needs. Understanding check valve function is crucial, preventing backflow and ensuring proper operation. Learning how to install a sewage pump safely often requires familiarizing yourself with local plumbing codes, such as those enforced by the International Association of Plumbing and Mechanical Officials (IAPMO). Choosing the right sump basin size and material significantly impacts the system’s longevity and performance.
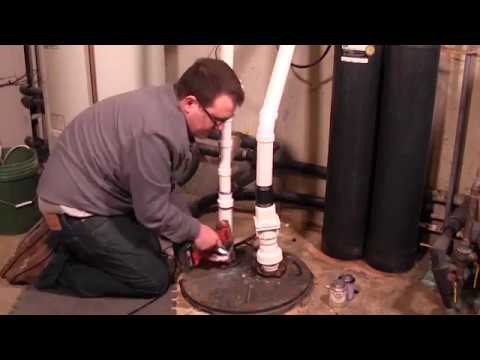
Image taken from the YouTube channel Zoeller At Home , from the video titled How to Install a Sewage Pump .
Conquering the DIY Sewage Pump Installation
A sewage pump, also known as an ejector pump, performs a vital, often unseen, role in wastewater management. Its primary function is to move sewage and wastewater from lower elevations to a higher elevation where it can then flow into the main sewer line or septic system via gravity. This is indispensable for homes where plumbing fixtures, such as bathrooms or laundry rooms, are located below the level of the main sewer line, most commonly in basements.
The Importance of Proper Installation
The effectiveness and longevity of a sewage pump hinges on a proper installation. A poorly installed pump can lead to a host of problems, including:
- Inefficient pumping: Reducing the pump’s ability to move waste effectively.
- Backflow: Causing sewage to flow back into the home.
- Premature failure: Shortening the pump’s lifespan.
- Potential health hazards: Creating unsanitary conditions.
Proper installation is not merely about connecting pipes; it’s about ensuring the entire system operates safely and efficiently, protecting your home and health.
The DIY Dilemma: Challenges and Rewards
Embarking on a DIY sewage pump installation is a significant undertaking. It presents challenges that require careful planning, a solid understanding of plumbing and electrical systems, and adherence to local building codes.
However, the rewards can be substantial.
Cost Savings: Professional plumbing services can be expensive. DIY installation eliminates labor costs, potentially saving you a significant amount of money.
Skill Acquisition: Completing a project like this will equip you with valuable skills in plumbing, electrical work, and problem-solving. This new knowledge can be applied to future home improvement endeavors.
Personal Satisfaction: There’s a unique sense of accomplishment that comes from completing a challenging project yourself. Knowing that you’ve successfully installed a critical system in your home can be incredibly rewarding.
While the DIY route offers compelling benefits, it’s crucial to approach the task with the right mindset. Diligence, preparedness, and a willingness to learn are essential for a successful outcome. This guide is designed to empower you with the knowledge and confidence to tackle this project, while also recognizing when it’s best to call in a professional.
Understanding Your System: Is a Sewage Pump Right for You?
Before diving into the intricacies of installation, it’s crucial to determine whether a sewage pump is indeed the correct solution for your needs. Misdiagnosing the problem can lead to unnecessary work and expense.
This section will help you clarify when a sewage pump is necessary and differentiate it from other types of pumps, ensuring you make an informed decision.
Identifying the Need for a Sewage Pump
A sewage pump, also known as an ejector pump, is specifically designed to handle solid waste and wastewater. It’s not a universal solution for all water-related issues.
The most common scenarios where a sewage pump becomes essential include:
-
Basement Bathrooms and Plumbing Fixtures: If you’re adding a bathroom, laundry room, or any plumbing fixture in a basement or area below the level of the main sewer line, gravity alone cannot carry the wastewater to the sewer. A sewage pump is necessary to lift the waste upwards to connect to the main line.
-
Uphill Sewer Line Connections: In situations where your home’s sewer line has to travel uphill to connect to the municipal sewer system or septic tank, a sewage pump provides the necessary force to overcome the elevation difference.
-
Homes Below the Main Sewer Line: If your property sits at a lower elevation than the municipal sewer line, wastewater cannot flow naturally. A sewage pump is essential to elevate the waste to the appropriate level.
Sewage Pump vs. Sump Pump: Knowing the Difference
It’s easy to confuse a sewage pump with a sump pump, but their functions are fundamentally different.
A sump pump is designed to remove groundwater that accumulates around the foundation of a building, preventing flooding. It handles relatively clean water and isn’t equipped to process solid waste.
A sewage pump, on the other hand, is built to handle raw sewage, including solid materials. Its impeller and motor are designed to grind and pump waste effectively. Using a sump pump for sewage would quickly lead to clogging and failure.
Sewage Pumps and Septic Systems
The relationship between a sewage pump and a septic tank is crucial to understand.
In some septic systems, a sewage pump might be needed to move wastewater from the house to the septic tank, especially if the tank is located uphill or at a distance.
More commonly, a sewage pump is used after the septic tank to pump effluent to a leach field or drain field that is at a higher elevation than the tank. This is particularly common in areas with challenging topography.
If your home utilizes a septic system, consider the layout and elevation differences to determine if a sewage pump is required either before or after the tank. A professional septic system installer or plumber can help assess your specific needs.
Preparing for the Installation: Essential Steps Before You Begin
Before you even think about picking up a wrench, meticulous preparation is paramount. Installing a sewage pump isn’t just about connecting pipes; it’s about ensuring safety, adhering to regulations, and selecting the right equipment for the job. Skipping these preliminary steps can lead to costly mistakes, safety hazards, and even legal repercussions.
Permits and Codes: Navigating the Regulatory Landscape
Installing a sewage pump is rarely a project that flies under the radar of local authorities. Ignoring building codes and skipping the permit process can lead to hefty fines, mandatory rework, and even legal action. Before you begin any work, it’s absolutely essential to investigate the regulations in your area.
Researching Local Codes and Permit Applications
Start by contacting your local building department or city hall. Many municipalities now have online resources where you can access building codes and permit applications. Look for sections related to plumbing, wastewater systems, and electrical work.
Pay close attention to regulations concerning pipe materials, electrical wiring standards, and backflow prevention devices. Download and carefully review all relevant documents.
The permit application will likely require detailed information about your project, including diagrams, equipment specifications, and possibly inspections at various stages of the installation.
Consequences of Non-Compliance
Working without the necessary permits can have serious consequences. If your installation doesn’t meet code, you may be forced to dismantle your work and redo it to meet the required standards. This can be incredibly expensive and time-consuming.
Furthermore, unpermitted work can affect your homeowner’s insurance coverage and the resale value of your property. Always prioritize obtaining the necessary permits to protect yourself and your investment.
Safety Equipment: Protecting Yourself from Hazards
Sewage pump installation involves potential exposure to wastewater, electrical hazards, and physical strain. Investing in the right safety equipment is not optional; it’s crucial for protecting your health and well-being.
Essential safety gear includes:
- Heavy-duty rubber gloves: To protect your hands from bacteria and contaminants in wastewater.
- Eye protection (safety glasses or goggles): To prevent splashes and debris from entering your eyes.
- Appropriate work attire: Wear clothing that covers your skin to minimize contact with wastewater. Consider disposable coveralls for added protection.
- Respirator (optional): If working in a poorly ventilated area or if you have respiratory sensitivities, a respirator can help filter out harmful fumes and particles.
- Steel-toed boots: To protect your feet from falling objects and potential hazards on the work site.
Tools: Assembling Your Arsenal
Having the right tools on hand will make the installation process smoother, safer, and more efficient. Attempting to improvise with the wrong tools can lead to damaged equipment, poor workmanship, and even injuries.
Here’s a comprehensive list of tools you’ll likely need:
- Wrenches (pipe wrench, adjustable wrench): For tightening and loosening pipe fittings. Ensure you have a variety of sizes.
- Screwdrivers (Phillips head, flathead): For securing electrical connections and mounting components.
- Pliers (channel-lock pliers, needle-nose pliers): For gripping, cutting, and manipulating wires and small parts.
- Level: To ensure proper alignment of pipes and the pump itself.
- Pipe cutter: For cleanly cutting PVC or ABS pipes to the required lengths.
- Electrical tester (multimeter): To verify electrical continuity and voltage levels. Crucial for safe electrical connections.
- Tape measure: For accurate measurements of pipe lengths and component placement.
- Utility knife: For scoring and cutting various materials.
- Drill (with appropriate drill bits): For creating pilot holes and securing mounting hardware.
- PVC/ABS cement and primer: For securely joining PVC or ABS pipe fittings.
- Teflon tape or pipe dope: For sealing pipe threads and preventing leaks.
Consider renting specialized tools, such as a pipe threader, if you only need them for this project. This can save you money and storage space.
Selecting the Right Pump: Matching the Pump to Your Needs
Choosing the correct sewage pump is arguably the most critical step in the entire process. A pump that’s too small will struggle to handle the wastewater load, leading to frequent breakdowns. A pump that’s too large will cycle on and off excessively, wasting energy and shortening its lifespan.
Consider these factors when selecting a sewage pump:
- Flow rate: Measured in gallons per minute (GPM), this indicates how much wastewater the pump can move in a given time. Estimate your peak wastewater flow based on the number of fixtures connected to the pump.
- Head pressure: Measured in feet, this indicates the maximum height the pump can lift the wastewater. Calculate the vertical distance from the pump to the discharge point, plus any friction loss in the pipes.
- Discharge pipe diameter: The diameter of the pipe that carries wastewater away from the pump. The pump’s discharge outlet should match or be adaptable to your existing plumbing.
- Pump type: Sewage pumps come in various configurations, including submersible pumps (designed to be submerged in the wastewater basin) and pedestal pumps (mounted above the basin). Choose the type that best suits your installation.
- Horsepower: The power of the motor, which affects the pump’s ability to handle solids and maintain flow rate.
Consult with a plumbing professional or a pump supplier to get personalized recommendations based on your specific requirements.
Step-by-Step Installation Guide: A Pro’s Approach
Having diligently prepared, secured permits, and gathered the necessary tools and equipment, we now arrive at the heart of the project: the installation itself. This stage requires precision, patience, and a commitment to following each step meticulously. Remember, safety is paramount, and a well-executed installation ensures long-term reliability.
Shutting Off Power and Water: Prioritizing Safety
Before touching any wires or pipes, the absolute first step is to completely disconnect the power supply to the pump circuit. Locate the circuit breaker that controls the sewage pump’s electrical supply and switch it to the "OFF" position. To confirm that the power is indeed off, use an electrical tester to check the wiring at the pump location.
Simultaneously, turn off the water supply to the plumbing system connected to the sewage pump. This will prevent any accidental flooding or water damage during the installation process. Usually, a main shut-off valve is located near the water meter or where the water line enters the house.
Removing the Old Pump (if applicable): A Careful Disassembly
If you are replacing an existing sewage pump, carefully remove the old unit. Begin by disconnecting any remaining electrical connections, ensuring the power is off first with your electrical tester! Disconnect the inlet and discharge pipes. Be prepared for some residual wastewater to spill during this process, and have buckets and absorbent materials ready.
Addressing Rusted Bolts and Difficult Access
One common challenge is dealing with rusted bolts or fittings. Apply a penetrating oil, such as WD-40, to the affected areas and allow it to soak in for several minutes. Use a wrench or pliers to gently loosen the bolts. If they are severely rusted, you may need to use a bolt extractor or even cut them off with a hacksaw.
Accessibility can also be an issue in confined spaces. Work slowly and methodically, using the right tools for the job. Consider using a socket wrench with extensions to reach difficult areas.
Safe Disposal of the Old Pump
Dispose of the old sewage pump responsibly. Check with your local waste management authorities for guidelines on disposing of electrical appliances and wastewater equipment. Some recycling centers may accept old pumps for scrap metal.
Connecting the Inlet and Discharge Pipes: Ensuring a Leak-Proof Seal
Connecting the inlet and discharge pipes correctly is crucial for preventing leaks and ensuring proper pump operation. Use the appropriate pipe fittings, such as PVC or ABS, depending on your existing plumbing system.
Choosing the Right Pipe Fittings
Select fittings that match the diameter of the inlet and discharge pipes and are compatible with the pump’s connections. Use adapters if necessary to transition between different pipe sizes or materials.
Proper Sealing and Alignment
Apply Teflon tape or pipe dope to the threads of all pipe fittings to create a watertight seal. Wrap the Teflon tape clockwise around the threads, overlapping each layer. Tighten the fittings securely with a wrench, but avoid over-tightening, which can damage the threads.
Ensure that the pipes are properly aligned before tightening the connections. Misalignment can cause stress on the pipes and fittings, leading to leaks over time.
Installing the Check Valve: Preventing Backflow
The check valve is a critical component that prevents wastewater from flowing back into the pump and the connected plumbing system when the pump shuts off. Install the check valve in the discharge pipe, orienting it according to the manufacturer’s instructions. The arrow on the valve body should point in the direction of the wastewater flow away from the pump. Secure the check valve using pipe fittings and sealant.
Electrical Connections: Following Code and Prioritizing Safety
Connecting the electrical wiring requires careful attention to detail and adherence to local building codes. Follow the manufacturer’s instructions for wiring the pump, and always double-check your connections before restoring power.
Grounding the Pump Properly
Grounding the pump is essential for preventing electrical shock hazards. Connect the ground wire (usually green or bare copper) to the grounding terminal on the pump and to a grounding point in the electrical panel.
Consulting a Qualified Electrician
If you are uncomfortable working with electricity, or if you are unsure about any aspect of the electrical connections, consult a qualified electrician. Incorrect wiring can lead to electrical shock, fire, or damage to the pump.
Installing the Float Switch: Automating Pump Operation
The float switch is responsible for automatically turning the pump on and off based on the water level in the basin or tank. Secure the float switch to the pump or the side of the basin according to the manufacturer’s instructions.
Adjusting the Float Switch
Adjust the float switch so that the pump turns on when the water level reaches a certain point and turns off when the water level drops to another level. Experiment with different settings to find the optimal balance between pump operation and water level.
Securing the Pump: Preventing Movement and Vibration
Properly positioning and securing the sewage pump within the basin or tank is important for preventing movement and vibration, which can damage the pump and connected pipes. Place the pump on a stable surface and use shims or supports if necessary to ensure that it is level. Some pumps have mounting brackets that can be used to secure them to the basin.
Testing the Installation: Ensuring Proper Operation
After completing the installation, thoroughly test the pump’s operation to ensure that everything is working correctly. Restore power to the circuit breaker and allow the basin or tank to fill with water.
Checking for Leaks
Carefully inspect all pipes and connections for leaks. Tighten any fittings that are leaking, and reapply sealant if necessary.
Verifying Float Switch Activation
Observe the float switch as the water level rises and falls. The pump should turn on automatically when the water reaches the activation point and turn off when the water level drops.
By meticulously following these steps, you can confidently install your sewage pump and ensure its reliable operation for years to come.
Troubleshooting Common Issues
Even with meticulous planning and execution, unforeseen problems can arise during or after a DIY sewage pump installation. Recognizing and addressing these issues promptly is crucial to ensure the system’s proper function and longevity. This section provides guidance on diagnosing and resolving some of the most common challenges encountered.
Identifying the Problem: A Systematic Approach
Before diving into solutions, it’s vital to accurately identify the root cause of the issue. Avoid the temptation to make hasty adjustments. A systematic approach will save time and prevent further complications.
Start by gathering information: What are the symptoms? When did the problem begin? Were there any unusual noises or occurrences preceding the issue?
Common Problems and Solutions
Several issues frequently plague sewage pump installations. Here are some of the most prevalent problems, along with potential causes and remedies.
Leaks
Leaks are a common nuisance, often stemming from improper connections or damaged seals.
- Location is Key: Pinpoint the exact location of the leak.
- Check Connections: Inspect all pipe connections for tightness and proper sealing. Ensure that Teflon tape or pipe dope was correctly applied during installation.
- Tighten Fittings: Gently tighten any loose fittings. Avoid overtightening, which can damage the fittings or pipes.
- Replace Seals: If the leak persists, consider replacing the seals or O-rings.
Pump Failure
Pump failure can manifest in various ways, from complete inoperation to reduced pumping capacity.
- Power Supply: Verify that the pump is receiving power. Check the circuit breaker and electrical connections.
- Overheating: The pump motor may have overheated due to excessive use or a blockage. Allow the pump to cool down before attempting to restart it. Check the water temperature in the basin if the environment it is housed in is prone to heat.
- Float Switch Issues: A malfunctioning float switch can prevent the pump from activating. Inspect the float switch for debris or obstructions that may hinder its movement. If the float is physically damaged, it will need to be replaced.
- Motor Problems: If the pump still fails to operate, the motor itself may be faulty. In this case, consider replacing the pump or consulting with a qualified technician.
Clogging
Clogs can significantly reduce the pump’s efficiency or even cause it to stop working entirely.
- Identify the Blockage: Determine the location of the clog. Is it in the inlet pipe, the pump impeller, or the discharge pipe?
- Clear Debris: Disconnect the power and carefully inspect the pump and pipes for any obstructions. Remove any debris such as feminine hygiene products, diapers, or excessive amounts of grease.
- Flush the System: After clearing the blockage, flush the system with clean water to ensure that all debris is removed.
Electrical Issues
Electrical problems can range from simple wiring errors to more complex issues with the pump motor or control panel.
- Wiring Connections: Double-check all wiring connections to ensure they are secure and properly insulated. Refer to the pump’s wiring diagram.
- Grounding: Verify that the pump is properly grounded. This is essential for safety and to prevent electrical shocks.
- Short Circuits: Look for signs of short circuits, such as burnt wires or tripped circuit breakers.
- Consult a Professional: If you are not comfortable working with electricity, consult a qualified electrician.
Unusual Noises
Strange noises emanating from the pump can indicate various problems, from loose components to internal damage.
- Grinding or Rattling: These noises may indicate a loose impeller or debris inside the pump housing.
- Humming: A humming sound could suggest a motor issue or a blockage.
- Vibrations: Excessive vibrations can be caused by improper mounting or worn bearings.
Diagnosing the Root Cause
Effective troubleshooting requires careful observation and a methodical approach. Consider these tips:
- Document Everything: Keep a record of the symptoms, the steps you take to troubleshoot the problem, and the results.
- Use a Multimeter: A multimeter can be invaluable for diagnosing electrical issues.
- Refer to the Manual: Consult the pump’s owner’s manual for troubleshooting tips and diagrams.
- Don’t Hesitate to Ask for Help: If you are unsure about any aspect of the troubleshooting process, seek assistance from a qualified professional.
Maintaining Your Sewage Pump: Extending Its Lifespan
Having successfully installed your sewage pump, the next crucial step is establishing a proactive maintenance routine. Neglecting maintenance can lead to premature failure, costly repairs, and unsanitary conditions. This section provides a comprehensive guide to ensuring your sewage pump operates reliably for years to come.
The Importance of Preventative Maintenance
Think of your sewage pump like a car: regular maintenance is essential for optimal performance and longevity. Neglecting basic upkeep can lead to major problems down the road. Preventative maintenance is key to avoiding costly repairs and ensuring the continuous functionality of your wastewater system.
Regular Inspection and Cleaning Procedures
Consistent monitoring and cleaning are the cornerstones of sewage pump maintenance. Aim to perform these tasks at least twice a year, or more frequently if your system handles a high volume of waste or is prone to clogging.
Visual Inspection
Begin with a thorough visual inspection. Look for signs of leaks, corrosion, or damage to the pump, pipes, and electrical connections. Check the condition of the basin or tank, ensuring it is free from cracks or structural issues.
Cleaning the Pump and Basin
Over time, sediment and debris can accumulate in the pump basin, reducing its capacity and potentially damaging the pump. To clean the basin:
- Disconnect the power supply to the pump.
- Manually empty the basin using a bucket or a shop vacuum.
- Scrub the interior walls of the basin with a brush and a mild detergent.
- Rinse thoroughly with clean water.
- Inspect the pump impeller for any obstructions and carefully remove them.
Inspecting the Float Switch
The float switch is responsible for automatically turning the pump on and off based on the water level in the basin. Ensure the float switch moves freely and is not obstructed by debris. Clean the float switch with a damp cloth to remove any buildup. Test its operation by manually raising and lowering the float to confirm that the pump activates and deactivates correctly.
Preventing Clogs and Ensuring Optimal Performance
Clogs are a major cause of sewage pump failure. Preventing clogs is paramount to maintaining a healthy system.
Proper Flushing Practices
The most effective way to prevent clogs is to be mindful of what you flush down the toilet. Avoid flushing anything other than toilet paper and human waste. Items like feminine hygiene products, diapers, wipes (even those labeled "flushable"), and paper towels can easily clog the pump and pipes.
Avoiding Overloading the System
Overloading the system with excessive water usage can also strain the pump and lead to premature failure. Be mindful of water consumption during peak hours, such as when running multiple appliances simultaneously (e.g., washing machine, dishwasher, showers).
Enzyme Treatments
Consider using enzyme treatments designed for sewage systems. These treatments help break down organic waste and prevent the buildup of sludge in the basin and pipes. Follow the manufacturer’s instructions carefully when using enzyme treatments.
Recommended Maintenance Schedule
To keep your sewage pump in peak condition, adhere to the following maintenance schedule:
-
Monthly: Check for unusual noises or vibrations during pump operation.
-
Semi-Annually (Every 6 Months): Perform a visual inspection of the pump, pipes, and electrical connections. Clean the pump basin and inspect the float switch.
-
Annually: Have a qualified plumber inspect the entire system, including the pump, pipes, and electrical components. This is especially important if you notice any persistent issues or if your system is more than 5 years old.
By following these guidelines, you can significantly extend the lifespan of your sewage pump and avoid costly repairs. Remember that consistent maintenance is an investment in the long-term reliability and efficiency of your wastewater system.
Having invested time and effort into maintaining your sewage pump, there will invariably come a point where a problem arises that stretches beyond the scope of DIY. Knowing when to hand over the reins to a professional is crucial, not only for your safety but also for ensuring the long-term integrity of your plumbing system. This section will help you identify those situations where calling a professional plumber is the wisest course of action.
When to Call a Professional: Recognizing Your Limits
While a DIY approach to sewage pump installation and maintenance can be empowering and cost-effective, it’s essential to recognize the limits of your expertise and when to enlist the help of a qualified professional. Some tasks are simply too complex or hazardous to attempt without the necessary training and experience. Ignoring this boundary can lead to costly mistakes, safety risks, and potential code violations.
Complex Electrical Work
Sewage pumps involve electrical components that demand a thorough understanding of wiring, grounding, and safety protocols. If you encounter complex electrical issues, such as faulty wiring, breaker tripping, or the need to run new circuits, it’s imperative to call a licensed electrician. Incorrect electrical work can result in electric shock, fire hazards, and damage to the pump.
Never attempt electrical repairs if you are uncomfortable or unfamiliar with electrical systems. It’s always better to err on the side of caution when dealing with electricity.
Difficult Sewer Line Connections
Connecting to the main sewer line can be a challenging task, often requiring specialized tools and expertise. If the sewer line is difficult to access, requires modifications, or is prone to leaks, it’s best to leave the work to a professional plumber. Incorrectly connected sewer lines can lead to sewage backups, environmental contamination, and costly repairs.
Working with sewer lines can also expose you to harmful bacteria and pathogens, making proper safety precautions essential. A professional plumber will have the necessary equipment and training to handle these risks safely.
Structural Issues
If you notice any structural issues with the pump basin, tank, or surrounding plumbing, such as cracks, leaks, or foundation problems, it’s crucial to seek professional help. These issues can compromise the integrity of the system and lead to serious damage.
Addressing structural problems often requires specialized knowledge and equipment. A qualified plumber can assess the situation and recommend the appropriate repairs or replacements.
Persistent or Recurring Problems
Sometimes, despite your best efforts, problems with your sewage pump persist or recur frequently. If you find yourself constantly troubleshooting the same issues, it’s time to call a professional. This could indicate an underlying problem that requires a more in-depth diagnosis and repair.
A professional plumber has the experience and tools to identify the root cause of persistent problems and provide lasting solutions. Don’t waste time and money on repeated DIY fixes that only address the symptoms.
The Risks of DIY Beyond Your Skill Level
Attempting repairs beyond your skill level can have serious consequences. Ignoring safety precautions can lead to injury, while incorrect repairs can damage the pump or plumbing system. Furthermore, DIY repairs that violate local building codes can result in fines and the need to redo the work.
It’s essential to be honest with yourself about your capabilities and limitations. There’s no shame in admitting that a task is beyond your comfort zone.
Finding a Qualified and Reputable Plumber
When it’s time to call a professional, it’s important to choose a qualified and reputable plumber. Look for plumbers who are licensed, insured, and experienced in working with sewage pumps. Ask for references and check online reviews to get a sense of their reputation.
It’s also a good idea to get multiple quotes before hiring a plumber. This will allow you to compare prices and services and choose the best option for your needs. Be sure to ask about their warranty policy and what kind of guarantees they offer.
By recognizing your limits and seeking professional help when necessary, you can ensure the safe and reliable operation of your sewage pump system for years to come. Prioritize your safety and the integrity of your plumbing by entrusting complex or hazardous tasks to qualified professionals.
Sewage Pump Install: FAQs
Hopefully, these frequently asked questions can help clarify your understanding of sewage pump installation!
What are the common signs I need a new sewage pump?
Frequent backups in your basement, gurgling sounds from your drains, or foul odors emanating from your sewage system are all telltale signs. If you notice any of these, it’s time to inspect and possibly replace your sewage pump. Learning how to install a sewage pump yourself can save time and money.
How often should I expect to replace a sewage pump?
The lifespan of a sewage pump depends on factors like usage and maintenance. However, a well-maintained sewage pump typically lasts between 7 to 10 years. Regular inspections can help extend its life. Following steps on how to install a sewage pump properly can also extend its lifespan.
What safety precautions should I take when installing a sewage pump?
Always disconnect the power supply to the pump before beginning any work. Wear appropriate personal protective equipment, including gloves and eye protection. Ensure proper ventilation when working with sewage. Safe practices are paramount when learning how to install a sewage pump.
What are the essential tools needed for a sewage pump installation?
You’ll generally need a wrench set, screwdrivers, pipe cutters, PVC cement, a level, and a measuring tape. Depending on your existing setup, you might also need specialized tools. Ensure you have all tools on hand before beginning how to install a sewage pump.
So, you’ve got the lowdown on how to install a sewage pump! Hopefully, you’re feeling confident enough to tackle that DIY project. Good luck, and remember – safety first!