Thinking about improving your home’s comfort and airflow? Learning how to install screens is a fantastic DIY project, and it’s easier than you might think! Proper screen installation tools, readily available at stores like The Home Depot, make the process smooth. Whether you’re aiming for insect protection or simply want to enjoy a breeze, mastering how to install screens will empower you to tackle window and door repairs. Follow along, and soon you’ll have the know-how to rival any handyman services professional.
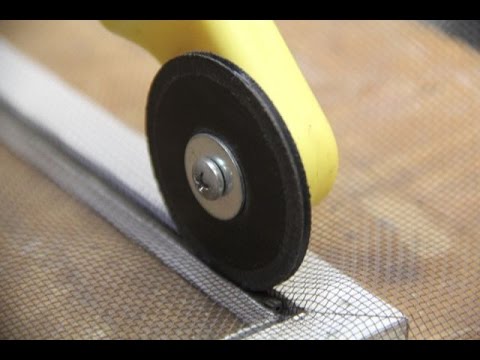
Image taken from the YouTube channel Concord Carpenter , from the video titled Replacing a Window Screen 5-Steps .
Easy DIY: Mastering the Art of Screen Installation
This guide will show you exactly how to install screens like a pro, even if you’ve never done it before! We’ll break down each step into easy-to-follow instructions. You’ll be amazed at how much money you can save and the satisfaction of completing this project yourself.
1. Gathering Your Supplies – The Key to Success
Before you even think about touching a window or door, make sure you have everything you need. This will prevent frustrating mid-project trips to the hardware store.
Essential Tools and Materials:
- New Screening: Choose the type of screen that best suits your needs. Fiberglass is a common, affordable option. Aluminum is more durable. Pet-resistant screening is great if you have furry friends!
- Screening Tool (Spline Roller): This is a must-have for pushing the spline into the frame.
- Spline: This rubber or vinyl cord holds the screen in place. Make sure you purchase the correct diameter spline, so you should measure the old spline, or consult your local hardware store representative.
- Utility Knife or Razor Blade: For trimming excess screening. A sharp blade is essential for a clean cut.
- Scissors: For initial cutting of the screening to roughly the right size.
- Measuring Tape: Accurate measurements are crucial.
- Screen Frame: (If you’re replacing the frame, too. Otherwise, you’ll be reusing your existing frames.)
- Screen Frame Corners: (If you’re replacing the frame, ensure you buy corners that match the frame profile.)
- Safety Glasses: Protect your eyes from debris.
- Gloves (Optional): To protect your hands.
Table: Choosing the Right Screening
| Type of Screening | Pros | Cons | Best For |
|---|---|---|---|
| Fiberglass | Affordable, easy to work with | Less durable than other options | General use, budget-friendly projects |
| Aluminum | Durable, long-lasting | More expensive, can be harder to work with | High-traffic areas, harsh weather |
| Pet-Resistant | Extremely durable, resists tearing/scratching | More expensive than fiberglass | Homes with pets, preventing damage |
| Solar Screening | Blocks UV rays, reduces heat gain | Can be more expensive | Sun-facing windows, energy efficiency |
2. Removing the Old Screen (If Applicable)
If you’re replacing an existing screen, carefully remove the old one.
Steps for Removal:
- Locate the Spline: You’ll see a flexible cord (the spline) around the edge of the screen, holding it in place.
- Use a Hooked Tool or Screwdriver: Gently lift one end of the spline out of the groove. A small, flathead screwdriver can work in a pinch.
- Pull out the Spline: Once you’ve lifted one end, you should be able to pull the spline out completely.
- Remove the Old Screening: With the spline removed, the old screen will simply fall out. Dispose of it properly.
3. Measuring and Cutting the New Screening
Accuracy is important here. It’s better to have a little extra screening than not enough.
How to Measure:
- Measure the Frame Opening: Measure the inside dimensions of the screen frame.
- Add Extra Material: Add at least 2 inches to each side of your measurements. This extra material gives you enough to grip while you’re rolling in the spline and allows for trimming later.
Cutting the Screening:
- Lay the Screening on a Flat Surface: Place the screening on a clean, flat surface like a table or workbench.
- Use Scissors for Initial Cut: Use scissors to cut the screening to roughly the size you need, using the measurements you took earlier. Don’t worry about being perfectly precise at this stage.
- Fine-Tune the Fit Later: The final, precise trimming will happen after the screen is secured.
4. Installing the New Screening
This is where the magic happens! Take your time and be patient.
Step-by-Step Installation:
- Position the Screening: Lay the screen material over the frame, ensuring it overlaps evenly on all sides.
- Start at One Corner: Use the spline roller to press the spline into the groove in one corner of the frame.
- Roll the Spline Along One Side: Apply even pressure with the spline roller as you roll the spline into the groove along one entire side of the frame. Keep the screen taut but not overly stretched.
- Repeat for Remaining Sides: Repeat the process for the remaining three sides.
- Maintain Tension: As you roll the spline into the groove, gently pull on the screen material to keep it taut and wrinkle-free.
- Overlapping Corners: When you reach the corner where you started, overlap the spline slightly. This ensures a secure seal.
5. Trimming the Excess Screening
Once the screen is securely in place, trim off the excess material.
Trimming Techniques:
- Use a Sharp Utility Knife: Use a new blade for a clean cut.
- Run the Knife Along the Frame: Run the utility knife along the outside edge of the spline, carefully trimming away the excess screening.
- Angle the Blade Slightly: Angle the blade slightly away from the spline to avoid accidentally cutting into it.
- Dispose of Scraps: Safely dispose of the trimmed screening.
6. Reinstalling the Screen Frame (If Applicable)
If you removed the frame to work on it, now’s the time to put it back.
Reinstallation Tips:
- Make Sure It Fits: Before securing the frame, ensure it fits properly in the window or door opening.
- Use Original Hardware: Use the same screws or clips that were originally used to attach the frame.
- Secure Properly: Make sure the frame is securely fastened to prevent it from falling out.
You did it! Now you can enjoy fresh air without the bugs.
FAQs: Easy DIY Screen Installation
Here are some common questions about installing screens yourself, explained simply.
What tools do I really need to install screens?
At a minimum, you’ll need a screen rolling tool, spline, screen mesh, a utility knife, and potentially a flathead screwdriver. A tape measure is crucial for accurate sizing, and depending on your frame, corner stakes might also be necessary.
How do I know what size spline to buy for my screens?
The best way to determine the correct spline size is to measure the old spline. If you don’t have the old spline, try inserting different sizes into the groove in your screen frame until you find one that fits snugly but isn’t overly difficult to insert. Getting the right size is key for how to install screens effectively.
What if the screen mesh isn’t perfectly taut after installation?
Minor imperfections are common. Try gently using the screen rolling tool again in areas that appear loose. Applying even pressure can help tighten the mesh. However, avoid over-stretching, as this can damage the screen or frame. If it’s excessively loose, you might need to redo it.
Can I replace a screen without removing the entire window or door frame?
Yes, absolutely! Screen replacement is typically done while the frame remains in place. You’re only replacing the screen mesh and spline within the existing frame. This is a core part of how to install screens and saves considerable time and effort.
Alright, you got this! Now go out there and show those screens who’s boss. Remember, even pros started somewhere, so don’t sweat the small stuff. You’re well on your way to mastering how to install screens!