Ensuring your kitchen plumbing functions correctly hinges on proper installation, especially when dealing with the dishwasher drain connected to a garbage disposal unit. The absence of a proper cap, particularly after installation, can lead to issues down the line. Homeowners frequently overlook the crucial step of correctly installing and maintaining the cap for dishwasher drain on garbage disposal, leading to potential leaks and backflow problems. Ignoring the advice from a qualified plumbing professional regarding the cap for dishwasher drain on garbage disposal can result in costly repairs. This article highlights five common mistakes to avoid when ensuring your cap for dishwasher drain on garbage disposal is properly in place, preventing future headaches.
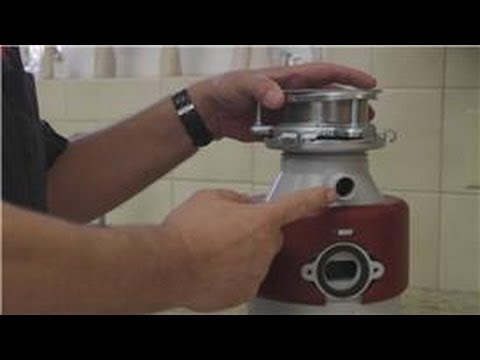
Image taken from the YouTube channel homesteady , from the video titled Home Appliances : How to Remove the Garbage Disposal Knockout Plug .
The Dishwasher-Garbage Disposal Connection: Capping It Right!
The unsung heroes of a modern kitchen, the dishwasher and garbage disposal often work in tandem to tackle the aftermath of meals. In many setups, the dishwasher cleverly utilizes the garbage disposal’s drain line for waste removal. This connection, while convenient, hinges on one critical element: proper drain management.
The key lies in understanding the garbage disposal’s drain cap, also known as a knockout plug. Whether you’re connecting your dishwasher to the disposal or not, this seemingly insignificant piece of plastic plays a vital role.
Why the Drain Connection Matters
When a dishwasher is connected to the disposal, the knockout plug needs to be carefully removed to allow for drainage. But what happens when a dishwasher isn’t connected? That’s where the drain cap comes in, acting as a seal to prevent all sorts of kitchen nightmares.
Ignoring this connection or improperly addressing it can lead to a cascade of problems:
-
Persistent leaks that can damage cabinetry and flooring.
-
Unpleasant odors wafting from the drain.
-
Stubborn clogs that disrupt the flow of wastewater.
-
Potentially even damage to the appliances themselves.
Navigating Potential Pitfalls
Ensuring a seamless and leak-free operation of your kitchen’s drainage system starts with avoiding common missteps. The following are five frequently encountered errors that homeowners make when dealing with the dishwasher-garbage disposal connection:
- Ignoring the Drain Cap Altogether
- Improper Removal of the Knockout Plug (If Connecting)
- Neglecting the Dishwasher Drain Hose Connection
- Ignoring Clogs and Backups
- Forgetting the Air Gap (If Required)
Understanding and avoiding these mistakes is crucial for maintaining a healthy and efficient kitchen. Let’s delve deeper into each of these pitfalls to ensure you "cap it right" every time.
Mistake #1: Ignoring the Drain Cap Altogether
Perhaps the most fundamental, and surprisingly common, error is completely overlooking the drain cap when a dishwasher isn’t connected to the garbage disposal. This seemingly insignificant piece of plastic is the only barrier between your kitchen and a world of plumbing problems.
The Drain Cap’s Vital Role
The drain cap, often referred to interchangeably with "knockout plug" even when it’s meant to stay in place, seals off the dishwasher drain inlet on the garbage disposal unit. Its purpose is simple: to create an airtight and watertight seal.
Without it, you’re left with an open hole directly into the disposal chamber.
This opening becomes a pathway for all sorts of undesirable things.
Consequences of Neglect
When the drain cap is missing or improperly sealed, you’re essentially inviting trouble. The most immediate consequence is usually a leak. Water from washing dishes or even general sink use can seep through the opening.
This leads to a pool of water underneath your sink. Over time, this moisture can damage the cabinet base, leading to costly repairs or even mold growth.
Beyond leaks, an uncapped drain can be a source of foul odors. Food particles trapped within the disposal decompose, and the resulting smells can escape through the open drain.
The kitchen will become a less pleasant place to be.
Even more unsettling, an open drain line provides easy access for pests. Cockroaches, ants, and other unwanted guests can crawl through the opening, turning your garbage disposal into their new home.
This poses a hygiene risk and creates a nuisance.
Visual Example: Capped vs. Uncapped
[Include image here: A split image showing a garbage disposal with the drain cap correctly installed on one side, and a garbage disposal with the drain port completely open on the other. The correctly installed cap should be clean and flush. The open port should be clearly visible and perhaps even have a visual indication of a potential leak (water stains).]
The image above illustrates the difference. A properly capped drain is clean, sealed, and prevents leaks. An uncapped drain is an open invitation for problems. Don’t let this simple oversight cause unnecessary headaches. Take the time to ensure the drain cap is correctly installed if you’re not using the dishwasher connection.
Mistake #2: Improper Removal of the Knockout Plug (If Connecting)
Now, let’s shift gears. What happens when you are connecting a dishwasher to your garbage disposal? While neglecting the drain cap is problematic when not connecting, botching the knockout plug removal can be equally disastrous when you are.
This mistake centers on the method, not the oversight.
Understanding the Knockout Plug’s Purpose
The knockout plug is a pre-molded piece of plastic inside the garbage disposal, specifically blocking the inlet designed for the dishwasher drain hose. It’s there for a reason. If you don’t have a dishwasher, it prevents leaks (as we discussed earlier).
But if you are installing a dishwasher, it must be removed to allow water to flow freely from the dishwasher to the disposal.
The Right Way to Knock It Out
The recommended method involves a hammer and screwdriver. Gently place the tip of the screwdriver against the center of the knockout plug. Then, tap the end of the screwdriver with the hammer.
The goal is not brute force. Rather, apply controlled pressure. A few well-placed taps should dislodge the plug without causing damage. Once loosened, you should be able to remove it completely by hand or with pliers.
The Perils of Excessive Force
This is where many homeowners go wrong. In their eagerness to connect the dishwasher, they resort to excessive force. This can lead to a host of problems:
-
Plastic Shards in the Disposal: Bashing away at the plug can cause it to shatter, sending small pieces of plastic flying into the disposal chamber. These fragments can damage the disposal’s internal components or clog the drain line further down the system.
-
Damage to the Disposal Housing: Applying too much force can crack or warp the surrounding plastic housing of the garbage disposal. This compromises the integrity of the unit and can create leaks, even if the dishwasher drain is properly connected.
-
A Poor or Uneven Seal: Even if you manage to remove the plug, a mangled or uneven opening can prevent a tight seal with the dishwasher drain hose. This, of course, defeats the purpose of connecting the dishwasher in the first place, resulting in leaks and potential water damage.
Checking Your Work
After removing the knockout plug, carefully inspect the opening. Ensure that the edges are smooth and free of any remaining plastic burrs or fragments. A clean, even opening is essential for a leak-free connection. Use a utility knife or sandpaper to smooth out any imperfections.
Mistake #3: Neglecting the Dishwasher Drain Hose Connection
Successfully navigating the drain cap and knockout plug is only half the battle. A seemingly straightforward step, neglecting the dishwasher drain hose connection is a common culprit behind kitchen leaks and plumbing woes. A loose, damaged, or improperly sized hose can undo all your previous efforts, leading to persistent problems.
Understanding the Connection: Hose and Clamp Dynamics
The dishwasher drain hose plays a crucial role, channeling wastewater from the dishwasher to the garbage disposal (or the sink drain if a disposal isn’t present).
Most dishwashers come equipped with a flexible hose designed to connect to a designated inlet on the disposal. This inlet is typically a cylindrical stub, sized to accommodate a standard dishwasher drain hose.
The hose is pushed onto this stub, and this is where the hose clamp becomes indispensable.
Hose clamps, typically metal bands tightened with a screw, provide the necessary force to create a watertight seal between the hose and the disposal inlet. They prevent the hose from slipping off due to water pressure and vibrations during the dishwasher’s operation.
The Importance of a Secure Seal
A tight, secure connection is paramount. Even a minor gap can result in a slow, persistent leak. Over time, this can lead to water damage under the sink, mold growth, and even structural problems in your cabinetry.
Furthermore, a loose connection can allow foul odors from the garbage disposal to escape into your kitchen.
Regularly inspect the connection for any signs of moisture or drips. If you detect a leak, don’t delay in addressing it.
Hose Size and Condition Matters
Using the correct size hose is also important. A hose that is too small will be difficult to fit securely onto the disposal inlet. Conversely, a hose that is too large will be prone to slipping, even with a clamp.
Always refer to your dishwasher’s manual for the recommended hose size.
Furthermore, inspect the hose itself for any signs of damage. Kinks, cracks, or punctures can compromise its integrity and lead to leaks. A kinked hose can also restrict water flow, causing the dishwasher to drain slowly or not at all. Replace a damaged hose immediately.
The Underestimated Power of the Hose Clamp
Never underestimate the importance of a properly installed hose clamp. Ensure that the clamp is positioned correctly, snug against the end of the hose where it connects to the disposal inlet.
Tighten the clamp securely, but avoid over-tightening, which can damage the hose.
A properly tightened clamp should create a firm, watertight seal without causing the hose to deform. If you’re unsure about the correct tightness, consult the clamp manufacturer’s instructions or a plumbing professional.
Mistake #4: Ignoring Clogs and Backups
A properly installed drain hose is a significant step in the right direction, but maintaining optimal flow requires diligence. Ignoring clogs and backups in the dishwasher drain or garbage disposal is a critical mistake that can escalate into significant plumbing headaches, costing you time, money, and peace of mind. What starts as a minor inconvenience can quickly turn into a major repair if left unaddressed.
Recognizing the Warning Signs: Symptoms of a Clogged Dishwasher Drain
The first step in preventing major problems is being able to identify the early warning signs of a clog. Pay close attention to your dishwasher’s performance and look for these telltale indicators:
-
Standing water in the dishwasher: This is perhaps the most obvious sign. If water remains at the bottom of the dishwasher long after the cycle has ended, it’s a clear indication that the drain is blocked.
-
Slow draining: Even if the dishwasher eventually drains, a noticeable delay compared to its usual draining time suggests a partial obstruction.
-
Foul odors emanating from the dishwasher or garbage disposal: Trapped food particles can decompose and create unpleasant smells.
-
Unusual noises during the draining process: Gurgling, bubbling, or other strange sounds may indicate that air is being forced through a partially blocked drain.
The Domino Effect: How Clogs Lead to Bigger Problems
Ignoring a clog doesn’t make it go away; it only allows the problem to worsen. Here’s how a seemingly minor blockage can snowball into more serious issues:
-
Increased pressure on plumbing connections: A clog restricts water flow, causing pressure to build up in the drain lines. This increased pressure can stress connections, leading to leaks at the hose connections, garbage disposal mount, or even further down the drainpipe.
-
Backflow of dirty water: In severe cases, a clog can cause wastewater to back up into the dishwasher or even the sink. This not only creates a sanitation issue, but also exposes your dishes and utensils to contaminated water.
-
Damage to the dishwasher and garbage disposal: Prolonged exposure to standing water and excessive pressure can damage the internal components of your dishwasher and garbage disposal, potentially shortening their lifespan.
DIY Solutions: Clearing Clogs Safely and Effectively
Fortunately, many clogs can be cleared with a few simple tools and household ingredients. Before calling a plumber, try these DIY methods:
-
Baking soda and vinegar: This classic combination can often dissolve grease and food buildup. Pour one cup of baking soda down the drain, followed by two cups of vinegar. Let it fizz for 30 minutes, then flush with hot water.
-
Boiling water: Sometimes, a simple flush with boiling water is enough to dislodge the clog. Be careful when handling boiling water to avoid burns.
-
Dishwasher drain snake: A small, flexible drain snake can be used to physically remove debris from the drain line. Insert the snake into the drain opening and carefully rotate it to break up or pull out the clog.
Using a drain snake can damage the impeller if it’s not done correctly, so approach it slowly and gently, and always consult a professional if you’re uneasy.
Proactive Prevention: Regular Maintenance is Key
The best way to avoid clogs is to prevent them from forming in the first place. Here are some preventative maintenance tips:
-
Scrape plates thoroughly: Remove as much food debris as possible from dishes before loading them into the dishwasher.
-
Avoid putting certain foods down the garbage disposal: Grease, coffee grounds, and fibrous vegetables can contribute to clogs.
-
Run the garbage disposal with plenty of water: This helps to flush food particles down the drain.
-
Clean the dishwasher filter regularly: The filter traps food particles and debris, preventing them from entering the drain line. Clean it every month or so, depending on usage.
By staying vigilant, addressing clogs promptly, and practicing preventative maintenance, you can keep your dishwasher drain and garbage disposal flowing smoothly and avoid costly repairs down the road.
Mistake #5: Forgetting the Air Gap (If Required)
While maintaining clear drains is crucial, protecting your potable water supply is paramount. One frequently overlooked component in dishwasher installation, particularly in areas with specific plumbing codes, is the air gap. Forgetting or intentionally omitting the air gap when it’s required can expose your household to potential health risks.
Understanding the Air Gap and its Function
An air gap is a plumbing device that provides a physical break between the dishwasher drain hose and the garbage disposal (or the sink drain line). This break prevents backflow – the undesirable reversal of wastewater flow – from the drain into the dishwasher and, potentially, into your clean water supply.
Imagine a scenario where a blockage occurs in your drain line while the dishwasher is draining. Without an air gap, the dirty water could be siphoned back into the dishwasher, contaminating the dishes and potentially even the water supply if the dishwasher is simultaneously filling.
The air gap, typically a small, chrome-plated cylinder mounted on the sink deck near the faucet, provides an unobstructed vertical space that prevents this siphoning action.
Code Requirements and Local Regulations
The necessity of an air gap is often dictated by local plumbing codes. Some municipalities mandate their installation to safeguard public health, while others may allow alternatives like a high-loop drain hose configuration (where the drain hose is routed as high as possible under the sink before connecting to the disposal) if specific conditions are met.
It’s imperative to check your local plumbing codes or consult with a licensed plumber to determine whether an air gap is required in your area. Ignoring local regulations can result in failed inspections and potentially require costly rework.
Proper Installation of an Air Gap
Installing an air gap involves connecting the dishwasher drain hose to the air gap inlet, and then connecting another hose from the air gap outlet to the garbage disposal inlet.
Ensure all connections are secure using hose clamps to prevent leaks. The air gap itself should be mounted securely to the sink deck. Follow the manufacturer’s instructions for your specific air gap model for detailed guidance.
Health Hazards of Omission
The consequences of neglecting to install an air gap when required extend beyond mere code violations. Backflow can introduce bacteria, viruses, and other contaminants from the drain line into your dishwasher.
This contaminated water can then come into contact with your dishes and utensils, posing a significant health risk to you and your family. Protect your household from potential water contamination by ensuring you adhere to local codes and install an air gap if required.
Troubleshooting Leaks and Drainage Problems
Even with meticulous installation and diligent adherence to best practices, dishwasher drain issues can arise. Identifying the root cause of leaks or slow drainage is the first step toward effective resolution. A proactive approach can save you from costly repairs and potential water damage.
Pinpointing the Source of a Leak
Dishwasher leaks can be frustratingly elusive, often appearing in unexpected places. A systematic approach is key to locating the origin.
-
Start with the Obvious: Begin by visually inspecting all visible connections – the dishwasher drain hose connection to the garbage disposal, the air gap (if present), and the water supply line. Look for obvious drips or signs of water accumulation.
-
Run the Dishwasher and Observe: Initiate a wash cycle and carefully monitor these connections throughout the process. Pay close attention during the drain cycle, as this is when leaks are most likely to occur.
-
Check the Door Seal: A worn or damaged door seal can cause leaks around the dishwasher’s perimeter. Inspect the seal for cracks, tears, or debris.
-
Inspect the Spray Arms: Cracks or loose connections in the spray arms can cause water to spray outside the intended area, leading to perceived leaks.
-
Examine the Internal Components: If external checks don’t reveal the source, the leak might originate from internal components such as the pump or hoses. This often requires removing the dishwasher’s access panels.
Addressing Common Issues Yourself
Once you’ve identified the source of the problem, you can often tackle it yourself with a few simple steps.
-
Tighten Connections: Loose connections are a common cause of leaks. Use a wrench or screwdriver to carefully tighten hose clamps and fittings. Be careful not to overtighten, as this can damage the components.
-
Replace Worn Parts: If you find cracked or damaged hoses, seals, or clamps, replace them with new ones. Ensure you use the correct replacement parts for your dishwasher model.
-
Clear Clogs: Slow drainage is often caused by clogs in the drain hose or garbage disposal. Try flushing the drain hose with hot water or using a drain snake to remove any obstructions. A mixture of baking soda and vinegar followed by hot water can also help dissolve minor clogs.
-
Check the Air Gap: If your dishwasher has an air gap, ensure it’s not clogged. You can usually disassemble and clean the air gap to remove any debris.
When to Call a Professional
While many dishwasher drain issues can be resolved with basic troubleshooting, some problems require the expertise of a qualified plumber.
-
Persistent Leaks: If you’ve tried tightening connections and replacing parts but the leak persists, it’s time to call a professional.
-
Internal Component Failures: Repairing internal components such as the pump or motor requires specialized knowledge and tools.
-
Complex Plumbing Issues: If the drainage problem is related to a larger plumbing issue in your home, such as a clogged drain line, a plumber can diagnose and resolve the problem more effectively.
-
Uncertainty: If you’re uncomfortable working with plumbing or electrical components, or if you’re unsure about the cause of the problem, it’s always best to err on the side of caution and consult a professional. Attempting repairs beyond your skill level can lead to further damage or even injury.
Dishwasher Drain Capped Right? Common Questions Answered
Got questions about properly capping your dishwasher drain and avoiding common mistakes? Here are some answers to help you get it right.
What happens if I don’t properly cap the dishwasher drain on garbage disposal?
Failing to remove the knockout plug and cap the dishwasher drain properly can lead to a few problems. Your dishwasher won’t drain correctly, leaving dirty water in the bottom. It can also cause garbage disposal odors to backflow into your dishwasher.
How do I know if the knockout plug is still in place for the dishwasher drain on garbage disposal?
Usually, you can feel for it inside the disposal drain opening. Before installing the drain hose, reach in and see if there’s a solid plug blocking the connection. If it’s there, you’ll need to knock it out carefully with a screwdriver and hammer.
What if I already connected my dishwasher drain hose, and now I suspect it’s not draining correctly?
Disconnect the dishwasher drain hose from the garbage disposal. Then, check inside the disposal’s drain opening to see if the cap for dishwasher drain on garbage disposal has been removed. You might need to use a flashlight for better visibility.
Can I reuse the knockout plug as the "cap" if I accidentally knock it out too early?
No, the knockout plug isn’t designed to be a reliable cap. It won’t create a proper seal. You’ll need to purchase an appropriate rubber cap from a hardware store to properly seal the unused dishwasher drain connection if you’re not connecting your dishwasher.
Alright, you’ve got the lowdown on avoiding those pesky dishwasher drain issues. Double-check that cap for dishwasher drain on garbage disposal, and you’ll be good to go! Happy dishwashing!