Achieving perfect square holes in wood is a skill every woodworker admires. Mortise chisels, fundamental tools for crafting clean edges, are often paired with techniques like drilling pilot holes to remove excess material before chiseling. Understanding the role of a sturdy workbench vise in securing your piece is crucial for precision. Many experienced woodworkers will also point out that practicing on scrap lumber is a smart way to hone your technique before tackling final pieces, ensuring you know precisely how to cut a square hole in wood with minimal error.
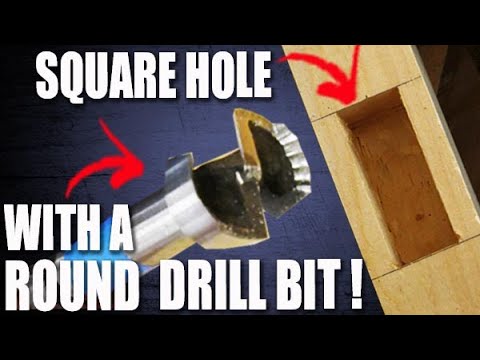
Image taken from the YouTube channel Stumpy Nubs (James Hamilton) , from the video titled Make a SQUARE hole with a ROUND forstner drill bit! .
The Quest for the Perfect Square Hole
Creating accurate square holes is a deceptively challenging, yet fundamental task in woodworking. It’s a skill that separates the seasoned craftsperson from the hobbyist.
While seemingly simple, achieving crisp, clean, and dimensionally accurate square holes requires precision, patience, and the right approach.
The consequences of imprecise square holes ripple throughout a project. Sloppy joinery weakens structural integrity, while poorly executed inlays detract from the overall aesthetic.
Why Square Holes Matter
Square holes are far more prevalent in woodworking than one might initially think. They serve as the foundation for a multitude of essential techniques.
From creating robust mortise-and-tenon joints, a cornerstone of sturdy furniture construction, to precisely fitting decorative inlays. The square hole is an unsung hero.
Consider the humble breadboard end on a tabletop. The square mortises that accept the tenons are critical for allowing seasonal wood movement while maintaining a seamless appearance.
Similarly, think about installing hardware like locksets or hinges. Accurately sized and shaped square recesses are essential for flush, functional, and aesthetically pleasing installations.
Mapping the Terrain: Methods Explored
In this article, we’ll explore three distinct yet effective methods for cutting square holes in wood. Each technique offers its own balance of speed, precision, and required tooling.
-
The Drill and Chisel Method: A classic approach relying on a combination of drilling to remove bulk material and chiseling to refine the shape. This method is accessible to woodworkers of all levels.
-
Drill Press Precision: Harnessing the power and accuracy of a drill press, this technique utilizes Forstner bits and careful setup to create dimensionally accurate square holes.
-
The Router Template Technique: Employing a router and a custom-made template, this method offers consistency and efficiency, particularly for repetitive tasks.
By mastering these techniques, you’ll be well-equipped to tackle a wide range of woodworking projects. Elevate your craftsmanship. And unlock new possibilities for design and construction.
Safety and Preparation: Setting the Stage for Success
Before diving into the intricacies of square hole creation, a firm foundation in safety and meticulous preparation is paramount. These steps aren’t mere suggestions; they are the cornerstones of a successful and, more importantly, safe woodworking endeavor. Neglecting these preliminary measures can lead to inaccurate results, damaged workpieces, or, worse, personal injury.
Safety First: A Non-Negotiable Principle
Woodworking, while rewarding, inherently involves tools and techniques that can pose significant risks if not handled with respect and caution.
Safety glasses are an absolute must, protecting your eyes from flying debris, a common occurrence when drilling, chiseling, or routing wood.
Similarly, the creation of square holes often generates a considerable amount of dust. Prolonged exposure to wood dust can lead to respiratory issues. Therefore, using dust collection systems, such as shop vacuums connected to your power tools, or wearing a properly fitted dust mask, is essential for maintaining a healthy work environment. Consider a respirator if working with particularly fine or irritating woods.
Accurate Layout: The Blueprint for Success
A precisely marked layout is the bedrock of any accurate woodworking project, and square holes are no exception. Sloppy marking will invariably lead to sloppy results.
The tools needed for accurate marking are simple: a sharp pencil and a reliable square (measuring tool).
The pencil should be kept sharp to create fine, easily visible lines. The square ensures that your layout lines are perfectly perpendicular, a critical requirement for a true square hole.
When marking, take your time and double-check your measurements. Accuracy at this stage will save you headaches later.
Securing the Workpiece: Preventing Unwanted Movement
Imagine trying to carve a precise shape on a piece of wood that is constantly shifting beneath your tools. This is why securely clamping your workpiece is non-negotiable.
Clamps hold the wood firmly in place, preventing movement during cutting operations. Use a variety of clamps to ensure the wood is secured from all sides.
Choose clamps appropriate for the size and shape of your workpiece, and always use protective pads to prevent marring the wood’s surface.
Remember that a stable workpiece translates directly to greater accuracy and control.
Wood Selection: An Important First Step
The type of wood you choose can significantly impact the ease and quality of creating square holes. Softer woods are generally easier to work with, but may be more prone to tear-out, especially around the edges of the hole. Harder woods require more effort, but often yield cleaner, crisper results.
Consider the grain direction of the wood as well. Cutting across the grain can sometimes cause splitting or splintering, particularly when using chisels. Experiment with scrap pieces of your chosen wood to determine the best approach before working on your final project.
Method 1: The Drill and Chisel Method – A Classic Approach
With safety measures addressed and the workpiece securely prepped, we can now explore the time-honored method of creating square holes using a drill and chisel. This technique, while requiring patience and a steady hand, is accessible to woodworkers of all skill levels and relies on fundamental woodworking principles.
The Core Principle: Drill, Then Define
The drill and chisel method operates on a simple premise: remove the bulk of the waste material with a drill, then refine the remaining opening with a chisel to achieve precise square corners and edges. This approach minimizes the amount of material you need to remove with a chisel, making the process more efficient and reducing the risk of splitting the wood.
Drilling the Waste Material
The initial step involves strategically drilling holes within the confines of your marked square.
There are two primary approaches: drilling a single pilot hole near the center of the square or drilling a series of overlapping holes that closely follow the inside perimeter of your marked lines.
The overlapping hole technique is generally preferred as it removes more material upfront, easing the chiseling process.
When executing the overlapping hole method, position the holes so that they slightly intersect, creating a scalloped edge along the inside of the square. This weakens the wood within the square, making it easier to remove with the chisel.
Choosing the Right Drill Bit
The type of drill bit you choose significantly impacts the quality of the resulting hole. While a standard twist drill bit can be used, it often produces ragged edges and a less-than-flat bottom.
For cleaner, more professional results, a Forstner bit is highly recommended.
Forstner bits are designed to create flat-bottomed holes with clean, crisp edges. This is particularly advantageous when creating square holes, as it minimizes the amount of chiseling required to achieve a perfectly square corner. Their design also reduces tear-out, especially when drilling across the grain.
Fine-Tuning with a Chisel
With the majority of the waste material removed, the next stage demands finesse and precision.
A sharp chisel is crucial here; a dull chisel requires more force, increasing the risk of slipping and damaging the wood. Sharpen your chisel before you begin, and consider honing it periodically throughout the process to maintain a keen edge.
The Process of Controlled Chiseling
Begin by positioning the chisel with its bevel facing into the square hole.
Carefully align the chisel’s cutting edge along the marked line.
Using a mallet, gently tap the chisel to remove a small sliver of wood. The key here is to take shallow, controlled cuts. Avoid attempting to remove too much material at once, as this can lead to splitting or chipping.
Work your way around the perimeter of the square, removing small amounts of wood with each pass. Focus on squaring the corners first, gradually working towards the center of each side.
Addressing the Corners
The corners are the most critical area to address. Use the chisel to create a crisp, 90-degree angle at each corner.
You may find it helpful to alternate between chiseling from the side and chiseling from the end to achieve a perfectly square corner.
Continuously check your progress with a square (measuring tool) to ensure accuracy.
The Importance of Wood Grain
Pay close attention to the direction of the wood grain. Chiseling against the grain can cause the wood to split or tear out. Always chisel with the grain whenever possible. If you encounter a section where the grain is running in an unfavorable direction, take even smaller cuts and proceed with extra caution.
Patience is key when using the drill and chisel method. Rushing the process will inevitably lead to mistakes. By taking your time and focusing on precision, you can achieve excellent results and create accurate square holes with this classic woodworking technique.
Method 2: Drill Press Precision for Square Holes
While the drill and chisel method provides a solid foundation for creating square holes, the drill press offers an elevated level of precision and control. This method leverages the inherent stability and accuracy of the drill press, especially when coupled with specialized drill bits, to create dimensionally accurate square holes.
The drill press is particularly well-suited for projects demanding consistent, repeatable results. If you need to create multiple identical square holes, the drill press will significantly improve efficiency and accuracy compared to manual methods.
Leveraging the Drill Press for Accuracy
The key to achieving precise square holes with a drill press lies in the setup. Taking the time to properly configure your drill press will translate directly into the quality of your finished product.
Setting Up for Precision
Begin by ensuring your drill press table is square to the drill bit. Misalignment here can lead to angled holes and inaccuracies that will compound throughout the process. Use a reliable square to check the table’s alignment and make any necessary adjustments.
Next, implement a system for repeatable hole placement. A fence attached to the drill press table provides a reliable reference point for aligning your workpiece. Alternatively, use stop blocks clamped to the table to control the distance the workpiece moves between holes. The method you choose will depend on the specific project and the size of the workpiece.
Consider creating a jig to hold the workpiece securely and consistently. This is especially helpful when working with smaller pieces or when creating multiple identical holes.
The Power of Forstner Bits
While standard twist drill bits can be used, Forstner bits are the preferred choice for creating clean, flat-bottomed holes necessary for square holes. Forstner bits feature a wide cutting edge that shears the wood fibers cleanly, minimizing tear-out and producing a smooth, precise hole.
The flat bottom of the Forstner bit also creates a consistent depth, which is crucial for achieving a uniform square hole. The outer rim helps to score the wood fibers ahead of the cut, which further reduces splintering.
Creating Overlapping Holes with the Drill Press
The process involves drilling a series of overlapping holes within the marked square. This removes the majority of the wood, leaving only a small amount of material to be cleaned up with chisels.
Carefully plan the layout of your overlapping holes. Ensure that each hole slightly intersects with the adjacent holes, creating a scalloped edge along the inside of the square. This weakens the wood fibers and simplifies the subsequent chiseling process.
Take your time and maintain a steady feed rate. Forcing the bit can cause tear-out or even damage the drill press. Let the bit do the work, and periodically clear away any accumulated wood chips.
Refining with Chisels
Even with the precision of a drill press and Forstner bits, some chisel work will be necessary to achieve perfectly square corners and edges.
Use a sharp chisel and a mallet to carefully pare away the remaining material. Work from the outside edges of the square inward, taking small, controlled cuts. This prevents splitting and ensures a clean, crisp edge.
Pay particular attention to the corners of the square. These areas are prone to tear-out, so use extra caution and take even smaller cuts. A paring chisel with a low bevel angle is ideal for this task.
With patience and careful technique, you can transform the overlapping holes into a precisely square opening.
The transition from the deliberate precision of the drill press brings us to a technique that blends power and accuracy: the router template method. This approach allows for the efficient creation of consistent square holes, especially when dealing with larger quantities or intricate designs.
Method 3: The Router Template Technique: Power and Precision
The router, guided by a carefully crafted template, transforms into a powerful tool for creating precise square holes. This method shines when consistency and repeatability are paramount. It’s also particularly useful for cutting square holes in materials where other methods might struggle. However, the accuracy of the final product hinges on the precision of the template and the selection of appropriate router bits.
Router Bit Selection: Choosing the Right Cutter
Selecting the correct router bit is crucial for achieving clean, accurate results. Several bit types are suitable for creating square holes, each with its own strengths and weaknesses:
-
Straight bits are a versatile choice, ideal for general-purpose routing. They excel at removing material quickly, but can sometimes leave a slightly rough edge.
-
Plunge-cut bits are designed to be safely lowered directly into the wood, making them ideal for creating enclosed shapes like square holes. Their ability to cut from the center outward is a significant advantage.
-
Spiral upcut bits excel at chip ejection, pulling material upwards and away from the cut. This reduces the risk of chip buildup and provides a cleaner finish, especially in softer woods. However, they can sometimes cause tear-out on the upper surface of the workpiece, so climb cutting may be needed to mitigate this.
-
Template guide bushings used in conjunction with straight bits allow the bit to follow the template precisely.
Consider the material you’re working with and the desired finish when selecting your bit.
Template Creation: The Foundation of Accuracy
The template is the heart of this method. It must be constructed with utmost care from a stable, rigid material like plywood or MDF. The template’s inner dimensions will dictate the size and shape of the square hole, so precise cutting and assembly are essential.
-
Start by accurately marking the desired square hole dimensions on your template material. Use a precise square to ensure perfect 90-degree angles.
-
Cut out the square opening using a jigsaw, bandsaw, or scroll saw. Leave a small amount of material for final cleanup.
-
Refine the edges of the opening with files or sandpaper to achieve perfectly straight and smooth sides. Double-check the dimensions against your original markings. The smoother and straighter the template edge, the cleaner the routed hole will be.
-
Reinforce the template if necessary, especially if you are making a large number of holes. Attach backing or reinforcing pieces of wood to the template.
-
Consider adding a base to the template which allows you to clamp it directly to the workpiece for added stability and precision.
Step-by-Step Routing: Cutting the Square Hole
With the right bit and a meticulously crafted template, you’re ready to rout your square hole.
-
Secure the Template: Firmly clamp the template to your workpiece. Ensure it is perfectly aligned with your layout marks. Movement during routing will ruin the accuracy of the hole.
-
Set the Router Depth: Calculate the total depth of cut, considering the material thickness. Set your router bit to take shallow passes. Trying to remove too much material at once can lead to tear-out, router bit overheating, or even kickback.
-
Make Multiple Passes: Gradually increase the depth of cut with each pass until you reach the desired depth.
-
Direction of Cut: Maintain a consistent routing direction around the template (typically climb cutting), overlapping each pass slightly to prevent ridges. Climb cutting provides better edge finish.
-
Clean Up: Once the hole is routed, inspect the edges for any imperfections. A sharp chisel or sandpaper can be used to refine the corners and edges for a perfectly square finish.
Remember, safety is paramount. Always wear safety glasses and hearing protection when routing. A dust mask or respirator is also essential to protect against airborne particles. A firm grip on the router and a steady hand will ensure a clean, accurate cut. With practice, the router template technique can become a go-to method for creating precise square holes in a variety of woodworking projects.
The transition from harnessing the power of the router brings us to a broader perspective. Regardless of the chosen method, certain fundamental practices elevate your square hole-making from adequate to exceptional. These aren’t mere suggestions; they are the cornerstones of precision woodworking.
Best Practices for Square Hole Mastery
Mastering the art of creating perfect square holes in wood requires more than just choosing the right tool. It demands a holistic approach that encompasses material selection, tool maintenance, meticulous execution, and unwavering patience.
Here are key practices that will significantly improve the consistency and quality of your square holes, no matter which method you prefer.
Wood Selection: The Foundation of Success
The type of wood you select significantly impacts the outcome of your project. Different species have varying densities, grain patterns, and hardness, all influencing how they react to cutting tools.
- Hardwoods, such as maple or oak, are more challenging to cut but offer cleaner edges and greater durability.
- Softwoods, like pine or fir, are easier to work with but are more prone to splintering and tear-out.
Regardless of the species, ensure the wood is properly surfaced (planed flat and smooth) and dried to the appropriate moisture content for your region and project. Warped or uneven wood will make accurate layout and cutting exceedingly difficult. Properly prepared wood will reduce frustration and increase the likelihood of a precise result.
Sharp Tools are Non-Negotiable
Dull tools are the enemy of precise woodworking. Trying to force a dull chisel or bit through wood not only requires more effort but also increases the risk of tear-out, splitting, and inaccurate cuts. A sharp tool slices cleanly through the wood fibers, leaving a smooth, crisp edge.
- Regularly sharpen your chisels, drill bits, and router bits.
- Invest in quality sharpening stones or a sharpening system and learn how to use them properly.
- Consider using a honing compound to further refine the cutting edge.
A keen edge translates to greater control, reduced effort, and a significantly improved final result.
Patience and Practice: The Virtues of a Craftsman
Rushing the process is a surefire way to make mistakes. Creating accurate square holes requires patience, precision, and a willingness to take your time.
- Before working on your final piece, practice your chosen technique on scrap wood.
- This allows you to refine your technique, adjust your tools, and identify any potential problems before they ruin your project.
- Start with shallow cuts and gradually increase the depth, carefully monitoring your progress.
Woodworking is a skill that improves with practice, and patience is the key to unlocking its secrets.
Frequent Checks and Adjustments: Maintaining Accuracy
Don’t assume that your initial layout and setup will remain perfect throughout the entire process. It’s essential to regularly check the accuracy of your hole as you work and make adjustments as needed.
- Use a precision square to verify that the corners are truly square and the sides are straight.
- If you notice any deviations, stop and correct them immediately.
- A small error early on can compound as you continue, leading to a significantly flawed final result.
By frequently checking your work and making timely adjustments, you can ensure that your square hole remains true to its intended dimensions. This meticulous approach is the hallmark of a skilled woodworker.
Square Hole Secrets: Frequently Asked Questions
Want to master cutting perfect square holes in wood? These FAQs provide quick answers to common questions.
What tools are best for creating square holes?
While a drill and chisel can work, a mortise machine or a specialized square drill bit (like a Forstner bit with a corner chisel) offer the cleanest and most precise results when learning how to cut a square hole in wood. A plunge router with a square template is also a good choice.
Can I use a regular drill to make square holes?
Yes, but it requires more skill and patience. You’ll need to drill a series of overlapping holes within the square outline, then use a chisel to square up the corners and clean the edges. This method for how to cut a square hole in wood is less precise than using specialized tools.
Is it difficult to learn how to cut a square hole in wood?
It depends on the method you choose. Using specialized tools like a mortise machine or square drill bit simplifies the process. With practice, even the drill-and-chisel method can yield good results. Proper layout and careful execution are key.
What type of wood is easiest to work with when cutting square holes?
Softer woods like pine and poplar are easier to chisel and cut compared to hardwoods like oak or maple. However, hardwoods will often produce a cleaner, crisper edge. Select the wood that best suits your project needs while learning how to cut a square hole in wood.
So there you have it! I hope you found these secrets helpful on how to cut a square hole in wood. Get out there, try it yourself, and don’t be afraid to experiment a little. Happy woodworking!