Ensuring a safe and proper gas stove hookup is paramount, requiring careful attention to detail. Understanding the role of a qualified plumber is crucial, as they possess the necessary expertise to navigate the complexities of gas line connections. Specifically, knowing how to connect gas stove to gas line demands adherence to local building codes, which stipulate precise requirements for materials and installation practices. Using the correct tools, like a pipe wrench, ensures secure and leak-free connections, preventing potential hazards within your kitchen environment.
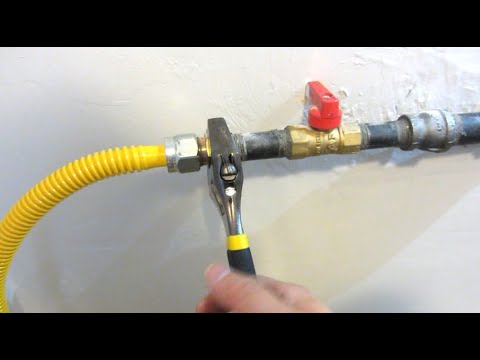
Image taken from the YouTube channel Poolarity – Life Hacks , from the video titled Gas Range Step by Step Installation | How to Install Gas Connector DIY .
Mastering Gas Stove Hookup for a Safe Home
Connecting a gas stove to your home’s gas line might seem like a straightforward task, but it’s a process that demands respect, precision, and a thorough understanding of the inherent risks. This isn’t just about getting your stove working; it’s about ensuring the safety and well-being of your household.
Understanding the Stakes
A faulty gas connection can lead to gas leaks, which, in turn, can result in explosions, fires, and carbon monoxide poisoning – all potentially deadly scenarios. Therefore, approaching this task with a cavalier attitude or a "wing it" mentality is simply unacceptable. Safety must be the absolute priority.
The Importance of Preparation
Before even thinking about touching a wrench, it’s crucial to grasp the fundamentals of gas line connections. This includes familiarizing yourself with the components involved, such as:
- Gas shut-off valves
- Pipe fittings
- Gas-rated sealant
Understanding their purpose and proper application is paramount.
Local Codes and Regulations: Your Guiding Star
One of the most crucial, yet often overlooked, aspects of any home improvement project involving gas lines is adherence to local building codes and regulations. These codes are not arbitrary; they are in place to protect you and your community.
Before you even gather your tools, take the time to research and understand the specific regulations in your area. This information is usually available from your local municipality’s building department. Neglecting this step could lead to costly fines, mandatory rework, and, more importantly, compromised safety.
These regulations dictate everything from the type of materials you can use to the specific procedures you must follow. Failure to comply can have serious consequences. Ignoring these guidelines is not an option.
Essential Preparations: Gathering Tools and Ensuring Compatibility
Before diving into the actual gas stove connection, meticulous preparation is paramount. This phase involves assembling the right tools and materials, confirming gas type compatibility, and verifying the presence of a functioning gas pressure regulator. Neglecting these steps can lead to hazardous outcomes and costly mistakes.
Tools and Materials Checklist: The Foundation of a Safe Installation
Having the correct tools and materials readily available is not just about convenience; it’s a fundamental aspect of safety. Here’s a comprehensive checklist:
-
Gas Stove Specifications and Manual: This is your primary resource. Refer to it for specific connection requirements, torque specifications, and safety guidelines specific to your model.
-
Gas Shut-off Valve: Consider installing a new, certified shut-off valve near the stove connection point. This allows for easy gas shut-off in emergencies or for future maintenance. Always opt for a valve that meets or exceeds local safety standards.
-
Pipe Thread Sealant (Gas-Rated): This sealant is specifically formulated to withstand the properties of natural gas or propane, ensuring a leak-proof seal on threaded connections. Never use Teflon tape not rated for gas; it can degrade over time and cause leaks.
-
Gas Leak Detector: Whether you choose a soap solution or an electronic gas leak detector, this tool is non-negotiable. It allows you to identify even the smallest leaks after the connection is made.
-
Wrenches (Two of Appropriate Sizes): Using the correct size wrenches is crucial to avoid damaging the fittings. Employ two wrenches – one to hold the existing gas pipe fitting steady and the other to tighten the connection.
-
Fittings: Ensuring you have the correct fittings is key. Identify the thread sizes and types on both your gas line and your new stove before purchasing fittings. Having the right fittings on hand is not only important for an easy installation, but also helps to ensure the safety of the gas line and appliance.
Determining Natural Gas or Propane Gas Compatibility
Gas stoves are designed to operate with either natural gas or propane, but not interchangeably without conversion. Operating a stove with the incorrect gas type can result in dangerous malfunctions, including carbon monoxide production and fire hazards.
Consult your stove’s manual to determine its designated fuel type. If converting from one gas type to another is required, only a qualified technician should perform the conversion. This typically involves changing burner orifices and adjusting the gas pressure regulator.
Confirming the Presence of a Gas Pressure Regulator
A gas pressure regulator is an essential safety device that reduces high-pressure gas from the supply line to a safe and consistent pressure for the stove. Without a regulator, the stove could receive too much gas, leading to excessively high flames and potentially dangerous conditions.
The regulator is typically located near the gas meter or where the gas line enters the house. Some stoves have built-in regulators, while others require an external one. Verify that a regulator is in place and functioning correctly before connecting the stove. If unsure, contact a qualified technician for assistance.
Step-by-Step Connection Guide: A Detailed Installation Walkthrough
With the necessary tools and compatibility checks complete, the moment arrives to connect your gas stove. This process demands meticulous attention to detail and strict adherence to safety protocols. Each step, outlined below, is designed to minimize risk and ensure a secure, leak-free connection.
Safety First: Absolutely Confirming the Gas is Off
Before even thinking about touching a wrench, the gas supply must be completely shut off. Locate the gas shut-off valve on the gas supply line, ideally the new one you installed. Turn the valve handle so that it is perpendicular to the gas pipe; this indicates the gas is off.
However, never rely solely on the valve’s position. Always verify that the gas is indeed off.
The surest way to confirm is by applying a gas leak detector (soap solution or an electronic detector) to the valve itself. Spray or brush the soapy water onto the valve connections.
If bubbles appear, the valve is leaking and needs immediate attention from a qualified professional. An electronic detector will beep or display a reading if gas is present. If either method indicates a leak, do not proceed. Contact a qualified technician immediately.
Connecting the Gas Line: A Delicate Dance
Now, prepare to connect the fittings. Ensure you have the correct fittings to adapt the gas line to the stove’s gas inlet. The stove manual is invaluable here, providing specific details about thread sizes and required adapters.
Before connecting any fittings, apply pipe thread sealant specifically rated for gas (natural gas or propane, as appropriate) to the male threads of the fittings. Apply the sealant evenly, covering all the threads. Avoid applying excess sealant, which can squeeze into the gas line and cause blockages. Do not apply sealant to the first thread. This will aid in preventing sealant from entering the gas line.
Important Note: Never use Teflon tape that is not gas-rated. It can degrade over time due to gas exposure, leading to leaks.
Carefully align the fittings with the gas line and the stove’s inlet. Begin threading the fittings by hand to avoid cross-threading. Cross-threading can damage the fittings and create a potential leak path.
Utilizing a Flexible Gas Connector: Adaptability and Safety
A flexible gas connector, often made of corrugated stainless steel, provides a safer and more convenient connection between the rigid gas line and the stove. It allows for some movement of the stove for cleaning or maintenance without stressing the gas line.
Select a connector of the appropriate length, ensuring it is long enough to reach the connection points without being stretched or excessively bent. Avoid sharp bends, as these can restrict gas flow and weaken the connector over time. A gentle curve is ideal.
Ensure the flexible connector is also rated for gas and meets local codes. Some codes may have specific requirements regarding the length or type of flexible connector allowed.
Tightening Connections with Wrenches: The Two-Wrench Technique
Once the fittings and flexible connector (if used) are hand-tightened, it’s time to secure them with wrenches. This is where the two-wrench technique becomes critical.
Use one wrench to hold the gas line fitting or the stove’s inlet steady. With the second wrench, tighten the fitting connecting to it. This prevents twisting or stressing the gas line itself, which could damage the pipe or create leaks at other connection points further back in the line.
Tighten the fittings until they are snug and secure. Avoid over-tightening, which can damage the threads or the fittings themselves. A firm, consistent pressure is sufficient. Refer to the gas stove manual for any specific torque recommendations.
After carefully connecting the gas line and tightening all fittings, the job is far from over. In fact, the next step is arguably the most critical: leak testing. This process verifies the integrity of your connections, ensuring that no gas escapes, and preventing potentially catastrophic consequences.
Leak Testing and Verification: Ensuring a Safe Connection
Rigorous leak testing is not merely a suggestion; it’s an absolute necessity. It’s the only way to guarantee that your gas stove connection is safe and sound. This section details how to conduct this testing effectively and what to do if you encounter any issues.
The Importance of Meticulous Application
The first step is to apply a gas leak detector to every single connection you’ve made. This includes the connection at the gas shut-off valve, all fittings between the valve and the stove, and the stove’s gas inlet itself.
Be generous with the leak detector, ensuring that all threaded joints and potential leak points are thoroughly covered.
Choosing Your Detection Method: Soap Solution vs. Electronic Detector
You have two primary options for leak detection: a soap solution or an electronic gas leak detector.
Soap Solution Method
The soap solution method involves mixing a small amount of dish soap with water. A spray bottle works well for application, though a brush can also be used.
After applying the solution, carefully inspect each connection for bubbles. Even small, slowly forming bubbles indicate a gas leak.
Electronic Gas Leak Detector Method
Electronic gas leak detectors offer a more sensitive and precise method. These devices detect the presence of gas in the air and will sound an alarm or display a reading if a leak is detected.
Follow the manufacturer’s instructions for proper use, paying close attention to the detector’s range and sensitivity settings. Slowly move the detector around all connections, holding it close but not touching the fittings.
Addressing and Resolving Detected Leaks
If you detect a leak using either method, do not panic. Immediately turn off the gas supply at the shut-off valve. Then, carefully assess the connection in question.
Most minor leaks can be resolved by carefully tightening the connection with two wrenches, ensuring you don’t twist the gas line.
Apply more pipe thread sealant and re-tighten the connection if tightening doesn’t solve the problem.
After re-tightening or re-sealing, repeat the leak test to confirm that the leak has been resolved.
When to Call a Qualified Technician/Plumber
While you can attempt to resolve minor leaks, there are situations where professional help is essential.
If you are unsure about the source of a leak or if you cannot resolve it after re-tightening and re-sealing, do not proceed. Contact a qualified technician or plumber immediately.
Additionally, if you detect a leak at the gas shut-off valve itself, this indicates a problem with the valve that requires professional attention.
Remember, gas leaks are serious and can pose significant safety risks. Err on the side of caution and seek professional assistance when needed. Your safety and the safety of your home depend on it.
After the painstaking work of ensuring a leak-free gas connection, the natural inclination might be to consider the job complete. However, successfully connecting the gas line is only half the battle. The subsequent steps, focused on verifying proper operation, are equally critical to guarantee both safety and functionality. This phase ensures that the stove is not only connected without leaks but also performing as intended.
Post-Connection Safety Checks: Verifying Proper Operation
The final stage involves a series of meticulous checks to confirm everything is working correctly and, most importantly, safely. Neglecting these checks can lead to undetected problems that could have serious consequences.
Gradual Gas Restoration
The first step is to slowly turn the gas shut-off valve back on.
This gradual restoration is crucial to prevent a sudden surge of pressure that could potentially damage the appliance or connected fittings.
Open the valve incrementally, allowing the gas pressure to equalize gradually within the system.
Burner and Oven Testing: Observation is Key
Once the gas supply is restored, test each burner and the oven individually.
Carefully observe the flame characteristics.
A healthy flame should be blue and consistent, without any yellow or orange flickering.
Yellow or orange flames often indicate incomplete combustion, which can lead to the production of carbon monoxide.
Furthermore, ensure that the ignition is prompt and reliable for each burner.
Hesitation or failure to ignite consistently could point to a problem with the igniter or gas flow.
Flame Color Analysis: Blue is Best
A blue flame is the hallmark of complete and efficient combustion.
Any deviation from this norm requires immediate attention.
Incomplete combustion can lead to the buildup of dangerous carbon monoxide levels within the home.
If you observe a yellow or orange flame, immediately shut off the gas supply and consult a qualified technician.
Do not attempt to use the stove until the issue is resolved.
Carbon Monoxide Detection: A Lifesaver
Following any gas appliance installation or connection, the immediate installation of a working carbon monoxide detector is paramount.
Place the detector in close proximity to the stove, following the manufacturer’s instructions for optimal placement.
Regularly test the detector to ensure it is functioning correctly.
Carbon monoxide is an odorless, colorless gas that can be deadly.
A working detector is your first line of defense against this silent threat.
Contacting the Gas Company: When in Doubt, Reach Out
If you notice any unusual smells, noises, or performance issues with your gas stove after connection, contact your gas company immediately.
Do not hesitate to seek professional assistance if you have any concerns about the safety or performance of your gas appliance.
Gas companies have trained professionals who can assess the situation and ensure your safety.
They are equipped to handle gas-related emergencies and can provide valuable guidance.
After meticulously verifying the stove’s proper operation – flame color, ignition reliability, and overall performance – a critical question remains: When is it absolutely necessary to call in a professional? Knowing when to abandon the DIY approach and seek expert help is paramount, ensuring both your safety and the integrity of your home.
When to Call a Professional: Prioritizing Safety and Expertise
Connecting a gas stove is not merely a matter of assembling components; it demands a thorough understanding of gas systems, adherence to strict safety protocols, and the ability to diagnose and resolve potential problems. While a confident DIYer might tackle the project, certain circumstances unequivocally warrant the expertise of a qualified technician or plumber.
Discomfort or Inexperience: Trust Your Gut
Perhaps the most fundamental indicator is your own comfort level. If at any point during the process you feel unsure, intimidated, or simply out of your depth, do not hesitate to call a professional. Working with gas lines demands precision and knowledge. A single misstep can have serious repercussions.
No amount of online research can replace hands-on experience and formal training. It’s far better to err on the side of caution than to risk a potentially dangerous situation. A licensed professional has the expertise to handle the complexities involved, ensuring a safe and compliant installation.
Unresolvable Gas Leaks: Red Alert
The detection of a gas leak, regardless of its apparent size, should immediately trigger a call to a qualified technician. Even a seemingly minor leak can escalate into a significant hazard, potentially leading to fire or explosion.
Attempting to fix a gas leak without the proper training and equipment is extremely dangerous. Do not attempt to tighten fittings excessively or apply excessive amounts of sealant in an effort to stop the leak. The risk is simply not worth it. Evacuate the area, turn off the main gas supply (if safe to do so), and contact a professional immediately.
Post-Connection Malfunctions: Beyond Troubleshooting
If, after connecting the gas stove, you encounter any operational issues, such as ignition problems, a weak or erratic flame, or unusual odors, it’s time to call for professional assistance. These issues can stem from various factors, including improper gas pressure, faulty components, or incorrect installation.
Attempting to diagnose and repair these problems without the necessary expertise can be both frustrating and dangerous. A qualified technician can accurately identify the root cause of the malfunction and implement the appropriate solution, ensuring that your gas stove operates safely and efficiently. Ignoring these issues can lead to carbon monoxide buildup, creating a silent and potentially deadly threat.
Reinforcing the Safest Option: A Professional’s Expertise
In conclusion, while DIY projects can be empowering and cost-effective, working with gas lines requires the utmost caution and expertise. A qualified technician or plumber possesses the knowledge, experience, and specialized tools necessary to ensure a safe and compliant gas stove connection. When in doubt, choosing the professional route is always the safest and most responsible option. Your safety, and the safety of your household, is simply not worth the risk.
Gas Stove Hookup: FAQs
Got questions about safely connecting your new gas stove? We’ve compiled some common concerns to help you avoid any disasters!
Is it safe to DIY a gas stove hookup?
While technically possible for experienced individuals, DIY gas stove hookup is generally discouraged due to the risk of gas leaks and potential explosions. We strongly recommend hiring a qualified and licensed professional for safe and compliant gas line connection.
What tools do I need to connect a gas stove to gas line?
If you are qualified and decide to proceed, you’ll need pipe wrenches, pipe thread sealant (approved for gas lines), a leak detection solution, a gas flex connector, and potentially fittings depending on your existing gas line setup. Always consult your stove’s manual.
What is the most important safety precaution when performing a gas stove hookup?
The absolute most important step is to ensure the gas supply is COMPLETELY shut off before you begin any work. Double-check the valve and test it if you are able. Then, always use a leak detection solution after you connect the gas stove to gas line to verify there are no leaks.
What happens if I smell gas after the gas stove hookup?
If you smell gas at any point after connecting your gas stove to gas line, immediately turn off the gas supply at the shut-off valve, evacuate the area, and call your local gas company or emergency services from a safe distance. Do not use any electrical switches or appliances.
Alright, hopefully, you’ve got a much better handle on how to connect gas stove to gas line safely now! Remember to take your time, double-check everything, and when in doubt, call a pro. Happy cooking!